Table/File Migration Jobs
Scenario
CDM supports table and file migration between homogeneous or heterogeneous data sources. For details about supported data sources, see Supported Data Sources.
Constraints
The dirty data recording function depends on OBS.
The JSON file of a job to be imported cannot exceed 1 MB.
The size of a file to be transferred cannot exceed 1 TB.
Field names of the source and destination parameters cannot contain ampersands (&) or number signs (%).
Prerequisites
A link has been created. For details, see Creating Links.
The CDM cluster can communicate with the data source.
Procedure
Log in to the management console and choose Service List > Cloud Data Migration. In the left navigation pane, choose Cluster Management. Locate the target cluster and click Job Management.
Choose Table/File Migration > Create Job. The page for configuring the job is displayed.
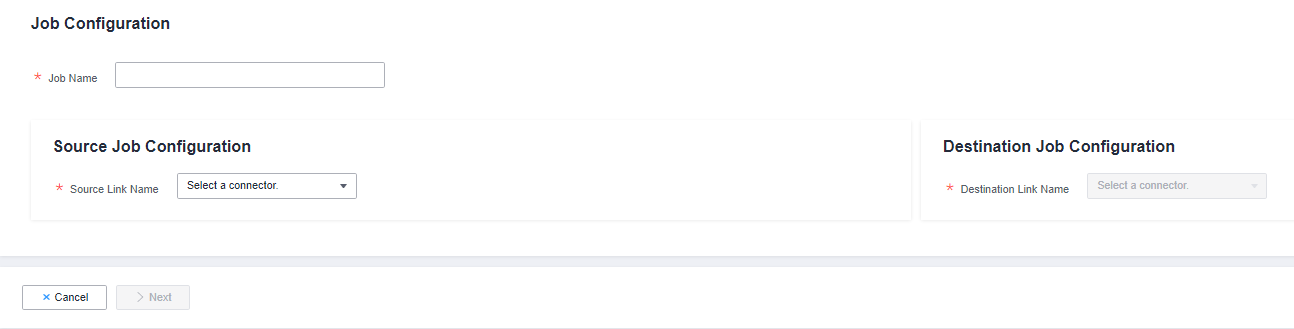
Figure 1 Creating a migration job
Select the source and destination links.
Job Name: Enter a string consisting of 1 to 240 characters. The name can contain digits, letters, hyphens (-), underscores (_), and periods (.), and cannot start with a hyphen (-) or period (.). An example value is oracle2rds_t.
Source Link Name: Select the data source from which data will be exported.
Destination Link Name: Select the data source to which data will be imported.
Configure the source link parameters.
The parameters vary with data sources. For details about the job parameters of other types of data sources, see Table 1 and Table 2.
Table 1 Source link parameter description¶ Migration Source
Description
Parameter Settings
OBS
Data can be extracted in CSV, JSON, or binary format. Data extracted in binary format is free from file resolution, which ensures high performance and is more suitable for file migration.
For details, see From OBS.
MRS HDFS
FusionInsight HDFS
Apache HDFS
HDFS data can be exported in CSV, Parquet, or binary format and can be compressed in multiple formats.
For details, see From HDFS.
MRS HBase
FusionInsight HBase
Apache HBase
CloudTable Service
Data can be exported from MRS, FusionInsight HD, open source Apache Hadoop HBase, or CloudTable. You need to know all column families and field names of HBase tables.
For details, see From HBase/CloudTable.
MRS Hive
FusionInsight Hive
Apache Hive
Data can be exported from Hive through the JDBC API.
If the data source is Hive, CDM will automatically partition data using the Hive data partitioning file.
For details, see From Hive.
DLI
Data can be exported from DLI.
For details, see From DLI.
FTP
SFTP
FTP and SFTP data can be exported in CSV, JSON, or binary format.
For details, see From FTP/SFTP.
HTTP
These connectors are used to read files with an HTTP/HTTPS URL, such as reading public files on the third-party object storage system and web disks.
Currently, data can only be exported from the HTTP URLs.
For details, see From HTTP.
Data Warehouse Service
Data can be exported from DWS.
For details, see From DWS.
SAP HANA
Data can be exported from SAP HANA.
For details, see From SAP HANA.
RDS for PostgreSQL
RDS for SQL Server
Microsoft SQL Server
PostgreSQL
Data can be exported from the cloud database services.
The non-cloud databases can be those created in the on-premises data center or deployed on ECSs, or database services on the third-party clouds.
When data is exported from these data sources, CDM uses the JDBC API to extract data. The job parameters for the migration source are the same. For details, see From PostgreSQL/SQL Server.
MySQL
Data can be exported from a MySQL database.
For details, see From MySQL.
Oracle
Data can be exported from an Oracle database.
For details, see From Oracle.
Database Sharding
Data can be exported from a shard.
For details, see From a Database Shard.
MongoDB
Document Database Service
Data can be exported from MongoDB or DDS.
For details, see From MongoDB/DDS.
Redis
Data can be exported from open source Redis.
For details, see From Redis.
Apache Kafka
DMS Kafka
MRS Kafka
Data can only be exported to Cloud Search Service (CSS).
For details, see From Kafka/DMS Kafka.
Cloud Search Service
Elasticsearch
Data can be exported from CSS or Elasticsearch.
For details, see From Elasticsearch or CSS.
MRS Hudi
Data can be exported from MRS Hudi.
For details, see From MRS Hudi.
MRS ClickHouse
Data can be exported from MRS ClickHouse.
For details, see From MRS ClickHouse.
ShenTong database
Data can be exported from a ShenTong database.
For details, see From a ShenTong Database.
Configure job parameters for the migration destination based on Table 2.
Table 2 Parameter description¶ Migration Destination
Description
Parameter Settings
OBS
Files (even in a large volume) can be batch migrated to OBS in CSV or binary format.
For details, see To OBS.
MRS HDFS
You can select a compression format when importing data to HDFS.
For details, see To HDFS.
MRS HBase
CloudTable Service
Data can be imported to HBase. The compression algorithm can be set when a new HBase table is created.
For details, see To HBase/CloudTable.
MRS Hive
Data can be rapidly imported to MRS Hive.
For details, see To Hive.
MySQL
SQL Server
PostgreSQL
Data can be imported to cloud database services.
For details about how to use the JDBC API to import data, see To MySQL/SQL Server/PostgreSQL.
DWS
Data can be imported to DWS.
For details, see To DWS.
Oracle
Data can be imported to an Oracle database.
For details, see To Oracle.
DLI
Data can be imported to DLI.
For details, see To DLI.
Elasticsearchor Cloud Search Service (CSS)
Data can be imported to CSS.
For details, see To Elasticsearch/CSS.
MRS Hudi
Data can be rapidly imported to MRS Hudi.
For details, see To MRS Hudi.
MRS ClickHouse
Data can be rapidly imported to MRS ClickHouse.
For details, see To MRS ClickHouse.
MongoDB
Data can be rapidly imported to MongoDB.
For details, see To MongoDB.
After the parameters are configured, click Next. The Map Field tab page is displayed.
If files are migrated between FTP, SFTP, OBS, and HDFS and the migration source's File Format is set to Binary, files will be directly transferred, free from field mapping.
In other scenarios, CDM automatically maps fields of the source table and the destination table. You need to check whether the mapping and time format are correct. For example, check whether the source field type can be converted into the destination field type.

Figure 2 Field mapping
Note
If the fields from the source and destination do not match, you can drag the fields to make adjustments.
On the Map Field tab page, if CDM fails to obtain all columns by obtaining sample values (for example, when data is exported from HBase, CloudTable, or MongoDB, or when data is migrated from SFTP/FTP to DLI, there is a high probability that CDM failed to obtain all columns), you can click
 and select Add a new field to add new fields to ensure that the data imported to the migration destination is complete.
When a relational database, Hive, DLI, or MRS Hudi is used as the migration source, sample values cannot be obtained.
On the Map Field page, you can click
 to add custom constants, variables, and expressions.
Column names are displayed when the source of the migration job is OBS, CSV files are to be migrated, and parameter Extract first row as columns is set to Yes.
When SQLServer is the destination, fields of the timestamp type cannot be written. You must change their type (for example, to datatime) so that they can be written.
When Hive serves as the source, data of the array and map types can be read.
Field mapping is not involved when the binary format is used to migrate files to files.
If the data is imported to DWS, you need to select the distribution columns in the destination fields. You are advised to select the distribution columns according to the following principles:
Use the primary key as the distribution column.
If multiple data segments are combined as primary keys, specify all primary keys as the distribution column.
In the scenario where no primary key is available, if no distribution column is selected, DWS uses the first column as the distribution column by default. As a result, data skew risks exist.
CDM supports field conversion. Click
 and then click Create Converter.
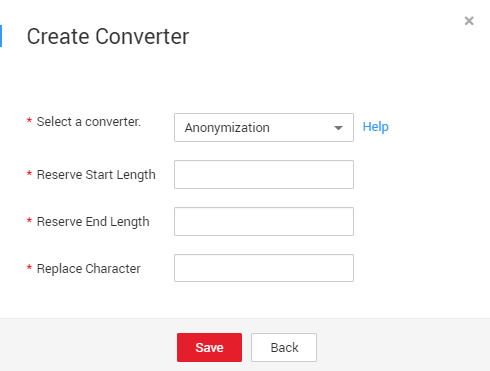
Figure 3 Creating a converter
CDM supports the following converters:
Anonymization: hides key data in the character string.
For example, if you want to convert 12345678910 to 123****8910, configure the parameters as follows:
Set Reserve Start Length to 3.
Set Reserve End Length to 4.
Set Replace Character to *.
Trim automatically deletes the spaces before and after the character string.
Reverse string automatically reverses a character string. For example, reverse ABC into CBA.
Replace string replaces the specified character string.
Expression conversion uses the JSP expression language (EL) to convert the current field or a row of data.
Remove line break deletes the newline characters, such as \n, \r, and \r\n from the field.
Note
If Use SQL Statement is set to Yes in the source job configuration, converters cannot be created.
Click Next, set job parameters, and click Show Advanced Attributes to display and configure optional parameters.
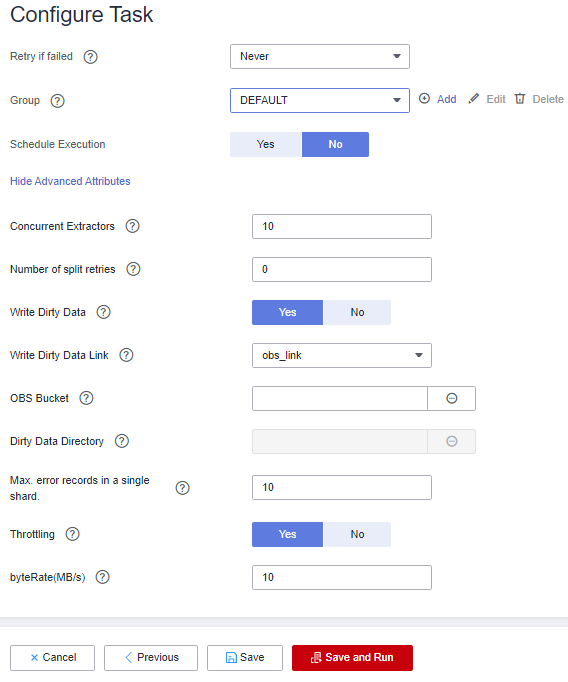
Figure 4 Task parameters
Table 3 describes related parameters.
Table 3 Parameter description¶ Parameter
Description
Example Value
Retry upon Failure
You can select Retry 3 times or Never.
You are advised to configure automatic retry for only file migration jobs or database migration jobs with Import to Staging Table enabled to avoid data inconsistency caused by repeated data writes.
Note
If you want to set parameters in DataArts Studio DataArts Factory to schedule the CDM migration job, do not configure this parameter. Instead, set parameter Retry upon Failure for the CDM node in DataArts Factory.
Never
Job
Select a group where the job resides. The default group is DEFAULT. On the Job Management page, jobs can be displayed, started, or exported by group.
DEFAULT
Schedule Execution
If you select Yes, you can set the start time, cycle, and validity period of a job. For details, see Scheduling Job Execution.
Note
If you use DataArts Studio DataArts Factory to schedule the CDM migration job and configure this parameter, both configurations take effect. To ensure unified service logic and avoid scheduling conflicts, enable job scheduling in DataArts Factory and do not configure a scheduled task for the job in DataArts Migration.
No
Concurrent Extractors
Configure the number of tasks to be split from a CDM job.
CDM migrates data through data migration jobs. It works in the following way:
When data migration jobs are submitted, CDM splits each job into multiple tasks based on the Concurrent Extractors parameter in the job configuration.
Note
Jobs for different data sources may be split based on different dimensions. Some jobs may not be split based on the Concurrent Extractors parameter.
CDM submits the tasks to the running pool in sequence. Tasks (defined by Maximum Concurrent Extractors) run concurrently. Excess tasks are queued.
By setting appropriate values for this parameter and the Maximum Concurrent Extractors parameter, you can accelerate migration.
Configure the number of concurrent extractors based on the following rules:
When data is to be migrated to files, CDM does not support multiple concurrent tasks. In this case, set a single process to extract data.
If each row of the table contains less than or equal to 1 MB data, data can be extracted concurrently. If each row contains more than 1 MB data, it is recommended that data be extracted in a single thread.
Set Concurrent Extractors for a job based on Maximum Concurrent Extractors for the cluster. It is recommended that Concurrent Extractors is less than Maximum Concurrent Extractors.
If the destination is DLI, you are advised to set the number of concurrent extractors to 1. Otherwise, data may fail to be written.
The maximum number of concurrent extractors for a cluster varies depending on the CDM cluster flavor. You are advised to set the maximum number of concurrent extractors to twice the number of vCPUs of the CDM cluster. For example, the maximum number of concurrent extractors for a cluster with 8 vCPUs and 16 GB memory is 16.
1
Concurrent Loaders
Number of Loaders to be concurrently executed
This parameter is displayed only when HBase or Hive serves as the destination data source.
3
Number of split retries
Number of retries when a split fails to be executed. Value 0 indicates that no retry will be performed.
0
Write Dirty Data
Whether to record dirty data. By default, this parameter is set to No.
Dirty data in CDM refers to the data in invalid format. If the source data contains dirty data, you are advised to enable this function. Otherwise, the migration job may fail.
Note
Dirty data can only be written to OBS paths. Therefore, this parameter is available only when an OBS link is available.
Yes
Write Dirty Data Link
This parameter is displayed only when Write Dirty Data is set to Yes.
You can only select an OBS link.
obs_link
OBS Bucket
This parameter is displayed only when Write Dirty Data Link is a link to OBS.
Name of the OBS bucket to which the dirty data will be written.
dirtydata
Dirty Data Directory
This parameter is displayed only when Write Dirty Data is set to Yes.
Dirty data is stored in the directory for storing dirty data on OBS. Dirty data is saved only when this parameter is configured.
You can go to this directory to query data that fails to be processed or is filtered out during job execution, and check the source data that does not meet conversion or cleaning rules.
/user/dirtydir
Max. Error Records in a Single Shard
This parameter is displayed only when Write Dirty Data is set to Yes.
When the number of error records of a single map exceeds the upper limit, the job will automatically terminate and the imported data cannot be rolled back. You are advised to use a temporary table as the destination table. After the data is imported, rename the table or combine it into the final data table.
0
Throttling
Enabling throttling reduces the read pressure on the source. It controls the CDM transmission rate, not the NIC traffic.
Note
Throttling can be enabled for non-binary file migration jobs.
To configure throttling for multiple jobs, multiply the rate by the number of concurrent jobs.
Throttling is not supported for binary transmission between files.
Yes
Max. error records in a single shard
Maximum rate for a job. To configure throttling for multiple jobs, multiply the rate by the number of concurrent jobs.
Note
The rate is an integer greater than 1.
20
Click Save or Save and Run. On the page displayed, you can view the job status.
Note
The job status can be New, Pending, Booting, Running, Failed, Succeeded, or Stopped.
Pending indicates that the job is waiting to be scheduled by the system, and Booting indicates that the data to be migrated is being analyzed.