Index Backup and Restoration
You can back up index data in clusters. If data loss occurs or you want to retrieve data of a specified duration, you can restore the index data. Index backup is implemented by creating cluster snapshots. When creating a backup for the first time, you are advised to back up data of all indices.
Managing Automatic Snapshot Creation: Snapshots are automatically created at a specified time each day according to the rules you create. You can enable or disable the automatic snapshot creation function and set the automatic snapshot creation policy.
Manually creating a snapshot: You can manually create a snapshot at any time to back up all data or data of specified indices.
Restoring data: You can use existing snapshots to restore the backup index data to a specified cluster.
Deleting a snapshot: Delete snapshots you do not require and release resources.
Note
Before creating a snapshot, you need to perform basic configurations, including configuring the OBS bucket for storing snapshots and IAM agency used for security authentication.
If there are available snapshots in the snapshot list when you configure the OBS bucket for storing cluster snapshots for the first time, you cannot change the bucket for snapshots that are subsequently created automatically or manually. Therefore, exercise caution when you configure the OBS bucket.
If you want to change the OBS bucket where there are snapshots, do as follows: Disable the snapshot function, enable it, and specify a new OBS bucket. After you disable the snapshot function, you cannot use previously created snapshots to restore the cluster.
If a cluster is in the Unavailable status, you can use the cluster snapshot function only to restore clusters and view existing snapshot information.
During backup and restoration of a cluster, you can perform only certain operations, including scaling out, accessing Kibana, viewing metric, and deleting other snapshots of clusters. However, you cannot perform the following operations: restarting or deleting the cluster, deleting a snapshot that is in the Creating or Restoring status, and creating or restoring another snapshot. If a snapshot is being created or restored for a cluster, any automatic snapshot creation task initiated for the cluster will be canceled.
Prerequisites
To use the function of creating or restoring snapshots, the account or IAM user that logs in to the CSS management console must have both of the following permissions:
Tenant Administrator for project OBS in region Global service
CSS Administrator in the current region
Managing Automatic Snapshot Creation
In the left navigation pane of the CSS management console, click Clusters.
On the Clusters page that is displayed, click the name of the target cluster. On the displayed page, click Cluster Snapshots.
On the displayed Cluster Snapshots page, click the icon to the right of Cluster Snapshot to enable the cluster snapshot function.
(Optional) After the cluster snapshot function is enabled, CSS automatically creates the OBS bucket and IAM agency for you to store snapshots. The automatically created OBS bucket and IAM agency are displayed on the page. If you want to change the OBS bucket and IAM agency, click
 to the right of Basic Configuration. To ensure the security of snapshot data, you can select a key to encrypt the snapshot.
In the displayed Edit Basic Configuration dialog box, you can either select an existing OBS bucket and IAM agency or create an OBS bucket and IAM agency. To create an OBS bucket, click Create Bucket. To create an IAM agency, click Create IAM Agency. For details, see Creating a Bucket and Creating an Agency. To encrypt the snapshot, select Snapshot Encryption and select a key.
Table 1 Parameter description¶ Parameter
Description
Restrictions
OBS Bucket
Name of the OBS bucket used for storing snapshots.
The following requirements must be met for existing OBS buckets or those that will be created:
Storage Class must be Standard or Warm.
When creating a bucket, do not enable the encryption function.
Note
To let an IAM user access an OBS bucket, you need to grant the GetBucketStoragePolicy, GetBucketLocation, ListBucket, and ListAllMyBuckets permissions to the user.
IAM Agency
IAM agency authorized by the current account to CSS access or maintain data stored in the OBS bucket.
The following requirements must be met for existing IAM agencies or those that will be created:
Agency Type must be Cloud service.
Set Cloud Service to CSS.
The agency must have the Tenant Administrator permission for the OBS(S3) project in OBS(S3).
Snapshot Encryption
Whether to enable the snapshot encryption function. Enabling the snapshot encryption function ensures the security of your snapshot data.
After selecting Snapshot Encryption, select a key from the Key Name drop-down list. If no key is available, click Create/View Key to switch to the KMS management console to create a key or modify an existing key. For details, see Creating a CMK.
You cannot use default master keys whose aliases end with /default in KMS to encrypt snapshots.
If a snapshot has been stored in the OBS bucket, you cannot modify the parameters used for encrypting the snapshot.
If the key used for encryption is in the Pending deletion or disable status, you cannot perform backup and restoration operations on the cluster. Specifically, you cannot create new snapshots for the cluster, or use existing snapshots to restore clusters. In this case, switch to the KMS management console and change the status of the target key to enable so that backup and restore operations are allowed on the cluster.
If you delete the key used for encryption, you cannot perform backup and restore operations on the cluster. In addition, you cannot restore the deleted key. Therefore, exercise caution when deleting a key.
You are advised to disable the automatic snapshot creation function if the key is deleted or is in the Pending deletion or disable status. In this case, automatic snapshots will be created based on the configured snapshot policy. However, all automatic snapshot creation tasks will fail, and the failed tasks will be displayed in the Failed Tasks dialog box.
Click the icon to the right of Automatic Snapshot Creation to enable the automatic snapshot creation function.
In the displayed Edit Snapshot Policy dialog box, specify parameters as required.
Snapshot Name Prefix: Enter a maximum of 31 characters starting with a letter. Only lowercase letters, digits, hyphens (-), and underscores (_) are allowed.. A snapshot name consists of a snapshot name prefix and a timestamp. For example, snapshot-2018022405925.
Time Zone: indicates the time zone for the backup time. Specify Backup Started based on the time zone.
Index: Enter the name of an index. The automatic snapshot creation function supports backup of certain indices in the cluster. Uppercase letters, spaces, and certain special characters (including
"\<|>/?)are not allowed. Use commas (,) to separate multiple indices. If you do not specify this parameter, data of all indices in the cluster is backed up by default. You can use the asterisk (*) to back up data of certain indices. For example, if you enter index*, then data of indices with the name prefix of index will be backed up.You can run the GET /_cat/indices command in Kibana to query names of all indices in the cluster. You can then enter the names of the indices you want to back up.
Backup Started: indicates the time when the backup starts automatically every day. You can specify this parameter only in hours and not minutes, for example, 00:00 or 01:00. The value ranges from 00:00 to 23:00. Select the backup time from the drop-down list box.
Retention Period (days): indicates the duration when snapshots are retained in the OBS bucket, in days. The value ranges from 1 to 90. You can specify this parameter as required. The system automatically deletes snapshots that are retained over the specified retention period on the half hour. For example, if you set the snapshot policy as shown in Figure 1, the system will automatically delete in 35 days at 00:30 the automated snapshots that were created 35 days earlier at 00:00.
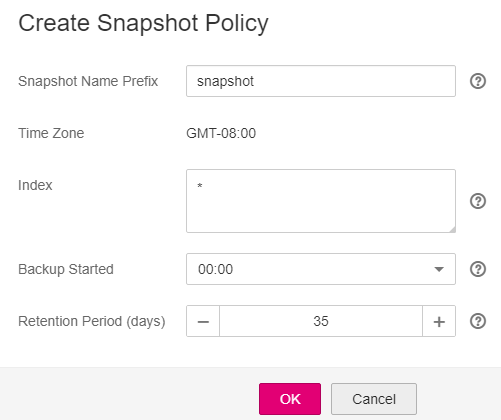
Figure 1 Automatic snapshot creation
Click OK.
After the policy for automatic snapshot creation is created, the policy information will be displayed on the Cluster Snapshots page. If you need to change the policy due to business changes, click
.Snapshots that are automatically created according to the snapshot policy are displayed in the snapshot list, along with manually created snapshots. You can distinguish them by the Snapshot Type setting. In the upper right corner of the snapshot list, enter the keyword of the snapshot name or snapshot ID to search for the desired snapshots. You can also click
 to sort snapshots based on related parameter settings.
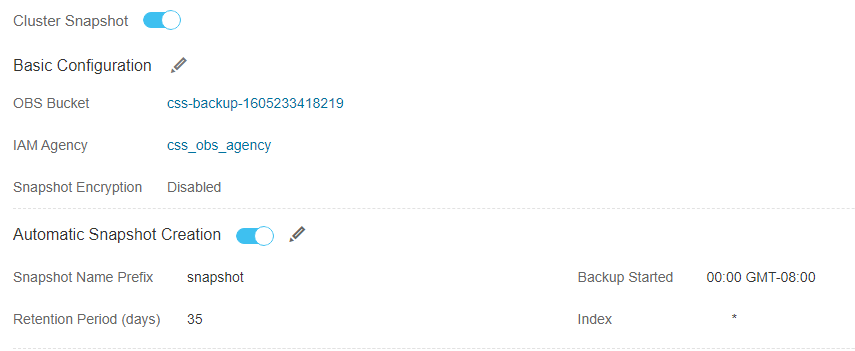
Figure 2 Automatic snapshot creation
(Optional) Disable the automatic snapshot creation function.
After you disable the automatic snapshot creation function, the system stops automatic creation of snapshots. If the system is creating a snapshot based on the automatic snapshot creation policy and the snapshot is not yet displayed in the snapshot list, you cannot disable the automatic snapshot creation function. In this case, if you click the button next to Automatic Snapshot Creation, a message is displayed, indicating that you cannot disable the function. You are advised to disable the function after the system completes automatic creation of the snapshot, and the created snapshot is displayed in the snapshot list.
When disabling the automatic snapshot creation function, you can choose whether to delete the snapshots that have been automatically created by selecting Delete automated snapshots in the displayed dialog box. By default, automatically created snapshots are not deleted.
If you do not select Delete automated snapshots, automatically created snapshots are not deleted when you disable the automatic snapshot creation function. You can manually delete them later. For details, see Deleting a Snapshot. If you do not manually delete the automatically created snapshots and enable the automatic snapshot creation function again, then all snapshots with Snapshot Type set to Automated in the snapshot list of the cluster can only be automatically deleted by the system. Specifically, the system automatically deletes snapshots based on the snapshot policy configured when you enable the automatic snapshot creation function again. For example, if you set Retention Period (days) to 10, the system will automatically delete the snapshots that have been retained for more than 10 days.
If you select Delete automated snapshots, all snapshots with Snapshot Type set to Automated in the snapshot list will be deleted when you disable the automatic snapshot creation function.
Manually Creating a Snapshot
In the left navigation pane of the CSS management console, click Clusters.
On the Clusters page that is displayed, click the name of the target cluster. On the displayed page, click Cluster Snapshots.
Alternatively, on the Clusters page, locate the row that contains the target cluster and click More > Back Up and Restore in the Operation column to switch to the Cluster Snapshots page.
On the displayed Cluster Snapshots page, click the icon to the right of Cluster Snapshot to enable the cluster snapshot function.
 indicates that the cluster snapshot function is disabled.
 indicates that the cluster snapshot function is enabled.
(Optional) After the cluster snapshot function is enabled, CSS automatically creates the OBS bucket and IAM agency for you to store snapshots. The automatically created OBS bucket and IAM agency are displayed on the page. If you want to change the OBS bucket and IAM agency, click
to the right of Basic Configuration. For details about how to configure parameters involved in the basic configuration, see 4.After basic configurations are completed, click Create.
Name indicates the name of the manually created snapshot, which can contain 4 to 64 characters and must start with a lowercase letter. Only lowercase letters, digits, hyphens (-), and underscores (_) are allowed. For snapshots you create manually, you can specify the snapshot name. The system will not automatically add the time information to the snapshot name.
Index: Enter the name of an index. The manually created snapshot can back up data of certain indices in the cluster. The value can contain 0 to 1,024 characters. Uppercase letters, spaces, and certain special characters (including
"\<|>/?)are not allowed. Multiple index names are separated by commas (,). If you do not specify this parameter, data of all indices in the cluster is backed up by default. You can use the asterisk (*) to back up data of certain indices. For example, if you enter 2018-06*, then data of indices with the name prefix of 2018-06 will be backed up.Note
Run the GET /_cat/indices command in Kibana to query all index names in the cluster.
Description: indicates the description of the created snapshot. The value contains 0 to 256 characters, and certain special characters (<>) are not allowed.
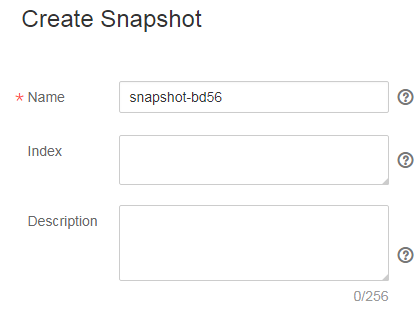
Figure 3 Creating a snapshot
Click OK.
After the snapshot is created, it will be displayed in the snapshot list. The status Available indicates that the snapshot is created successfully. All automatically and manually created snapshots are displayed in the snapshot list. You can distinguish them by the Snapshot Type setting. In the upper right corner of the snapshot list, enter the keyword of the snapshot name or snapshot ID to search for the desired snapshots. You can also click
to sort snapshots based on related parameter settings.
Restoring Data
You can use snapshots whose Snapshot Status is Available to restore cluster data. The stored snapshot data can be restored to other clusters.
Restoring data will overwrite current data in clusters. Therefore, exercise caution when restoring data.
In the Snapshots area, locate the row that contains the snapshot you want to restore and click Restore in the Operation column.
In the displayed dialog box, specify parameters as required.
Index: Enter the name of the index you want to restore. If you do not specify any index name, data of all indices will be restored. The value can contain 0 to 1,024 characters. Uppercase letters, spaces, and certain special characters (including
"\<|>/?)are not allowed.Rename Pattern: Enter a regular expression. Indices that match the regular expression are restored. The default value index_(.+) indicates restoring data of all indices. The value contains 0 to 1,024 characters. Uppercase letters, spaces, and certain special characters (including
"\<|>/?,)are not allowed.Rename Replacement: Enter the index renaming rule. The default value restored_index_$1 indicates that restored_ is added in front of the names of all restored indices. The value can contain 0 to 1,024 characters. Uppercase letters, spaces, and certain special characters (including
"\<|>/?,)are not allowed. You can set Rename Replacement only if you have specified Rename Pattern.Cluster: Select the cluster that you want to restore. You can select the current cluster or others. However, you can only restore the snapshot to clusters whose status is Available. If the status of the current cluster is Unavailable, you cannot restore the snapshot to the current cluster. If you select another cluster and two or more indices in the cluster have the same name, data of all indices with the same name as the name you specify will be overwritten. Therefore, exercise caution when you set the parameters.
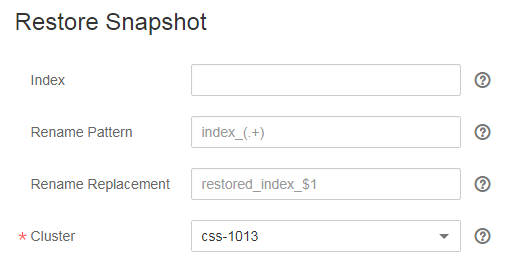
Figure 4 Restoring a snapshot
Click OK. If restoration succeeds, Task Status of the snapshot in the snapshot list will change to Restoration succeeded, and the index data is generated again according to the snapshot information.

Figure 5 Successful restoration
Deleting a Snapshot
If you no longer need a snapshot, delete it to release storage resources. If the automatic snapshot creation function is enabled, snapshots that are automatically created cannot be deleted manually, and the system automatically deletes these snapshots on the half hour after the time specified by Retention Period (days). If you disable the automatic snapshot creation function while retaining the automated snapshots, then you can manually delete them later. If you do not manually delete the automatically created snapshots and enable the automatic snapshot creation function again, then all snapshots with Snapshot Type set to Automated in the snapshot list of the cluster can only be automatically deleted by the system.
Note
After a snapshot is deleted, its data cannot be restored. Exercise caution when deleting a snapshot.
In the Snapshots area, locate the row containing the target snapshot and click Delete in the Operation column.
In the Delete Snapshot dialog box that is displayed, click Yes.