Getting Started with Elasticsearch
This section describes how to use Elasticsearch for product search. You can use the Elasticsearch search engine of CSS to search for data based on the scenario example. The basic operation process is as follows:
Scenario Description
A women's clothing brand builds an e-commerce website. It uses traditional databases to provide a product search function for users. However, due to an increase in the number of users and business growth, the traditional databases have slow response and low accuracy. To improve user experience and user retention, the e-commerce website plans to use Elasticsearch to provide the product search function for users.
This section describes how to use Elasticsearch to provide the search function for users.
Assume that the e-commerce website provides the following data:
{
"products":[
{"productName":"Latest art shirts for women in 2017 autumn","size":"L"}
{"productName":"Latest art shirts for women in 2017 autumn","size":"M"}
{"productName":"Latest art shirts for women in 2017 autumn","size":"S"}
{"productName":"Latest jeans for women in spring 2018","size":"M"}
{"productName":"Latest jeans for women in spring 2018","size":"S"}
{"productName":"Latest casual pants for women in spring 2017","size":"L"}
{"productName":"Latest casual pants for women in spring 2017","size":"S"}
]
}
Step 1: Create a Cluster
Create a cluster using Elasticsearch as the search engine. In this example, suppose that you create a cluster named Es-xfx. This cluster is used only for getting started with Elasticsearch. For this cluster, you are advised to select css.medium.8 for Node Specifications, Common I/O for Node Storage Type, and 40 GB for Node Storage Capacity. For details, see Creating a Cluster in Non-Security Mode.
Create a cluster using Elasticsearch as the search engine. In this example, suppose that you create a cluster named Sample-ESCluster. This cluster is used only for getting started with Elasticsearch. For this cluster, you are advised to select ess.spec-4u8g for Node Specifications, High I/O for Node Storage Type, and 40 GB for Node Storage Capacity. For details, see or .
After you create the cluster, switch to the cluster list to view the created cluster. If the Status of the cluster is Available, the cluster is created successfully.

Figure 1 Creating a cluster
Step 2: Import Data
CSS supports importing data to Elasticsearch using Logstash, Kibana, or APIs. Kibana lets you visualize your Elasticsearch data. The following procedure illustrates how to import data to Elasticsearch using Kibana.
On the Clusters page, locate the target cluster and click Access Kibana in the Operation column to go to the Kibana login page.
Non-security cluster: The Kibana console is displayed.
Security cluster: Enter the username and password on the login page and click Log In to go to the Kibana console. The default username is admin and the password is the one specified during cluster creation.
In the navigation pane of Kibana on the left, choose Dev Tools.
The text box on the left is the input box. The triangle icon in the upper right corner of the input box is the command execution button. The text box on the right area is the result output box.
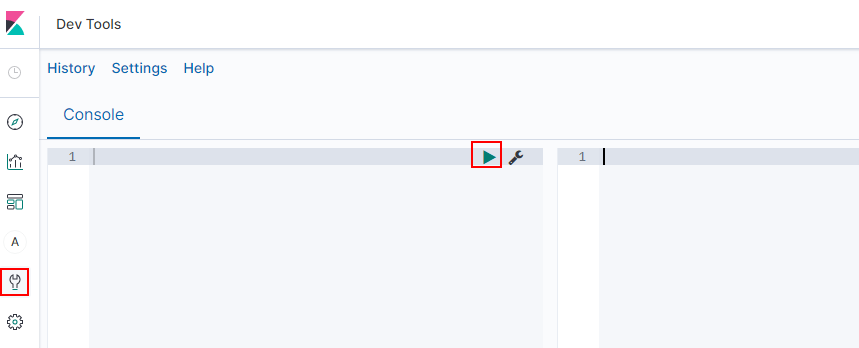
Figure 2 Console page
Note
The Kibana UI varies depending on the Kibana version.
On the Console page, run the following command to create index named my_store:
Versions earlier than 7.x
PUT /my_store
{
  "settings": {
    "number_of_shards": 1
  },
  "mappings": {
    "products": {
      "properties": {
        "productName": {
          "type": "text",
          "analyzer": "ik_smart"
        },
        "size": {
          "type": "keyword"
        }
      }
    }
  }
}
Versions 7.x and later
PUT /my_store
{
  "settings": {
    "number_of_shards": 1
  },
  "mappings": {
          "properties": {
            "productName": {
              "type": "text",
              "analyzer": "ik_smart"
        },
        "size": {
          "type": "keyword"
        }
      }
    }
  }
The command output is similar to the following:
{
  "acknowledged" : true,
  "shards_acknowledged" : true,
  "index" : "my_store"
}
On the Console page, run the following command to import data to index named my_store:
Versions earlier than 7.x
POST /my_store/products/_bulk
{"index":{}}
{"productName":"Latest art shirts for women in 2017 autumn","size":"L"}
{"index":{}}
{"productName":"Latest art shirts for women in 2017 autumn","size":"M"}
{"index":{}}
{"productName":"Latest art shirts for women in 2017 autumn","size":"S"}
{"index":{}}
{"productName":"Latest jeans for women in spring 2018","size":"M"}
{"index":{}}
{"productName":"Latest jeans for women in spring 2018","size":"S"}
{"index":{}}
{"productName":"Latest casual pants for women in spring 2017","size":"L"}
{"index":{}}
{"productName":"Latest casual pants for women in spring 2017","size":"S"}
Versions 7.x and later
POST /my_store/_doc/_bulk
{"index":{}}
{"productName":"Latest art shirts for women in 2017 autumn","size":"L"}
{"index":{}}
{"productName":"Latest art shirts for women in 2017 autumn","size":"M"}
{"index":{}}
{"productName":"Latest art shirts for women in 2017 autumn","size":"S"}
{"index":{}}
{"productName":"Latest jeans for women in spring 2018","size":"M"}
{"index":{}}
{"productName":"Latest jeans for women in spring 2018","size":"S"}
{"index":{}}
{"productName":"Latest casual pants for women in spring 2017","size":"L"}
{"index":{}}{"productName":"Latest casual pants for women in spring 2017","size":"S"}
If the value of the errors field in the command output is false, the data is imported successfully.
Step 3: Search for Data
Full-text search
If you access the e-commerce website and want to search for commodities whose names include "spring jeans", enter "spring jeans" to begin your search. The following example shows the command to be executed on Kibana and the command output.
Command to be executed on Kibana:
Versions earlier than 7.x
GET /my_store/products/_search
{
  "query": {"match": {
    "productName": "spring jeans"
  }}
}
Versions 7.x and later
GET /my_store/_search
{
  "query": {"match": {
    "productName": "spring jeans"
  }}
}
The command output is similar to the following:
{
  "took": 80,
  "timed_out": false,
  "_shards": {
    "total": 1,
    "successful": 1,
    "skipped": 0,
    "failed": 0
  },
  "hits": {
    "total": 4,
    "max_score": 1.8069603,
    "hits": [
      {
        "_index": "my_store",
        "_type": "products",
        "_id": "yTG1QWUBRuneTTG2KJSq",
        "_score": 1.8069603,
        "_source": {
          "productName": "Latest jeans for women in spring 2018",
          "size": "M"
        }
      },
      {
        "_index": "my_store",
        "_type": "products",
        "_id": "yjG1QWUBRuneTTG2KJSq",
        "_score": 1.8069603,
        "_source": {
          "productName": "Latest jeans for women in spring 2018",
          "size": "S"
        }
      },
      {
        "_index": "my_store",
        "_type": "products",
        "_id": "yzG1QWUBRuneTTG2KJSq",
        "_score": 0.56677663,
        "_source": {
          "productName": "Latest casual pants for women in spring 2017",
          "size": "L"
        }
      },
      {
        "_index": "my_store",
        "_type": "products",
        "_id": "zDG1QWUBRuneTTG2KJSq",
        "_score": 0.56677663,
        "_source": {
          "productName": "Latest casual pants for women in spring 2017",
          "size": "S"
        }
      }
    ]
  }
}
Elasticsearch supports full-text search. The preceding command searches for the information about all commodities whose names include "spring" or "jeans".
Unlike traditional databases, Elasticsearch can return results in milliseconds by using inverted indexes.
Elasticsearch supports sorting by score. In the command output, information about the first two commodities contains both "spring" and "jeans", while that about the last two products contain only "spring". Therefore, the first two commodities rank prior to the last two due to high keyword match.
Aggregation result display
The e-commerce website provides the function of displaying aggregation results. For example, it classifies commodities corresponding to "spring" based on the size so that you can collect the number of products of different sizes. The following example shows the command to be executed on Kibana and the command output.
Command to be executed on Kibana:
Versions earlier than 7.x
GET /my_store/products/_search
{
"query": {
"match": { "productName": "spring" }
},
"size": 0,
"aggs": {
"sizes": {
"terms": { "field": "size" }
}
}
}
Versions 7.x and later
GET /my_store/_search
{
"query": {
"match": { "productName": "spring" }
},
"size": 0,
"aggs": {
"sizes": {
"terms": { "field": "size" }
}
}
}
The command output is similar to the following:
Versions earlier than 7.x
{
  "took": 66,
  "timed_out": false,
  "_shards": {
    "total": 1,
    "successful": 1,
    "skipped": 0,
    "failed": 0
  },
  "hits": {
    "total": 4,
    "max_score": 0,
    "hits": []
  },
  "aggregations": {
    "sizes": {
      "doc_count_error_upper_bound": 0,
      "sum_other_doc_count": 0,
      "buckets": [
        {
          "key": "S",
          "doc_count": 2
        },
        {
          "key": "L",
          "doc_count": 1
        },
        {
          "key": "M",
          "doc_count": 1
        }
      ]
    }
  }
}
Versions 7.x and later
{
  "took" : 27,
  "timed_out" : false,
  "_shards" : {
    "total" : 1,
    "successful" : 1,
    "skipped" : 0,
    "failed" : 0
  },
  "hits" : {
    "total" : {
      "value" : 3,
      "relation" : "eq"
    },
    "max_score" : null,
    "hits" : [ ]
  },
  "aggregations" : {
    "sizes" : {
      "doc_count_error_upper_bound" : 0,
      "sum_other_doc_count" : 0,
      "buckets" : [
        {
          "key" : "L",
          "doc_count" : 1
        },
        {
          "key" : "M",
          "doc_count" : 1
        },
        {
          "key" : "S",
          "doc_count" : 1
        }
      ]
    }
  }
}
Step 4: Delete the Cluster
Once you understand the process and method of using Elasticsearch, you can perform the following steps to delete the cluster you created for the example and its data to avoid resource wastage.
Note
After you delete a cluster, its data cannot be restored. Exercise caution when deleting a cluster.
Log in to the CSS management console. In the navigation pane on the left, choose Clusters > Elasticsearch.
Locate the row that contains cluster Es-xfx and click More > Delete in the Operation column.
In the displayed dialog box, enter the name of the cluster to be deleted and click OK.