Creating an Elasticsearch Cluster in Non-Security Mode
This section describes how to create an Elasticsearch cluster in non-security mode.
Context
When creating a cluster, the number of nodes that can be added varies according to the node type. For details, see Table 1.
Table 1 Number of nodes in different types¶ Node Type
Number
ess
ess: 1-32
ess, ess-master
ess: 1-200
ess-master: an odd number ranging from 3 to 9
ess, ess-client
ess: 1-32
ess-client: 1-32
ess, ess-cold
ess: 1-32
ess-cold: 1-32
ess, ess-master, ess-client
ess: 1-200
ess-master: an odd number ranging from 3 to 9
ess-client: 1-32
ess, ess-master, ess-cold
ess: 1-200
ess-master: an odd number ranging from 3 to 9
ess-cold: 1-32
ess, ess-client, ess-cold
ess: 1-32
ess-client: 1-32
ess-cold: 1-32
ess, ess-master, ess-client, ess-cold
ess: 1-200
ess-master: an odd number ranging from 3 to 9
ess-client: 1-32
ess-cold: 1-32
Details about the four node types:
ess: the default node type that is mandatory for cluster creation. The other three node types are optional.
ess-master: master node
ess-client: client node
ess-cold: cold data node
Procedure
Log in to the CSS management console.
Click Create Cluster in the upper right corner. The Create Cluster page is displayed.
Specify Region and AZ.
Table 2 Parameter description for Region and AZ¶ Parameter
Description
Region
Select a region for the cluster from the drop-down list on the right. Currently, only eu-de is supported.
AZ
Select an AZ associated with the cluster region.
You can select one or more AZs. For details, see Multi-AZ HA.
Set basic information about the cluster. Specifically, specify Version and Name.
Table 3 Description of basic parameters¶ Parameter
Description
Version
Select a cluster version from the drop-down list box.
Name
Name of a cluster. Cluster names contain 4 to 32 characters. Only letters, numbers, hyphens (-), and underscores (_) are allowed and the value must start with a letter.
Note
After a cluster is created, you can modify the cluster name as required. Click the name of a cluster to be modified. On the displayed Basic Information page, click next to the cluster name. After the modification is completed, click
 to save the modification. If you want to cancel the modification, click
  .
.Set host specifications of the cluster.
Table 4 Parameter description¶ Parameter
Description
Nodes
Number of nodes in a cluster.
If neither a master node nor client node is enabled, the nodes specified by this parameter are used to serve as both the master node and client node. Nodes provide the cluster management, data storage, cluster access, and data analysis functions. To ensure data stability in the cluster, it is recommended that you set this parameter to a value no less than 3.
If only the master node function is enabled, nodes specified by this parameter are used to store data and provide functions of client nodes.
If both the master and client node functions are enabled, the nodes specified by this parameter are only used for storing data.
If only the client node function is enabled, nodes specified by this parameter are used to store data and provide functions of the master node.
CPU Architecture
Currently, x86 and Kunpeng are supported. The supported type is determined by the actual regional environment.
Node Specifications
Specifications of nodes in a cluster. You can select a specified specification based on your needs. Only one node specification can be selected for each cluster. You cannot select the CPU and memory resources that have been sold out.
Currently, the following flavors are supported: css.medium.8, css.large.8, css.xlarge.8, css.2xlarge.8, and css.4xlarge.8.
After you select a flavor, the CPU and memory corresponding to the current specification are displayed below the parameter. For example, if you select css.medium.8, then 1 vCPUs | 8 GB will be displayed, indicating that the node flavor you select contains one vCPU and 8 GB memory.
Node Storage Type
In the current version, the following options are available: Common I/O, High I/O, and Ultra-high I/O.
Node Storage Capacity
Storage space. Its value varies with node specifications.
Value range of flavor css.medium.8: 40 GB to 640 GB
Value range of flavor css.large.8: 40 GB to 1,280 GB
Value range of flavor css.xlarge.8: 40 GB to 2,560 GB
Value range of flavor css.2xlarge.8: 80 GB to 5,120 GB
Value range of flavor css.4xlarge.8: 160 GB to 10,240 GB
Disk Encryption
If you select this option, the nodes in the cluster you create will use encrypted EVS disks to protect data. By default, this option is not selected. Note that you cannot modify this setting after the cluster is created. Therefore, exercise caution when performing the setting.
After you select this option, you need to select an available key from the Key Name drop-down list. If no key is available, click Create/View Key to go to the KMS management console and create or modify a key. For details, see Creating a CMK.
Enabling disk encryption has no impact on your operations on a cluster (such as accessing the cluster and importing data to the cluster). However, after you enable disk encryption, operation performance deteriorates by about 10%.
Note
If the cluster is in the Available status and the key used for disk encryption is in the Pending deletion or disable status or has been deleted after a cluster is created, cluster scale-out is not allowed. However, other operations on the cluster, such as restarting the cluster, creating snapshots, restoring the cluster, and importing data to the cluster are not affected. In addition, this key cannot be used for cluster creation in the future.
After a cluster is created, do not delete the key used by the cluster. Otherwise, the cluster will become unavailable.
The Default Master Keys cannot be used to create grants. Specifically, you cannot use Default Master Keys whose aliases end with /default in KMS to create clusters.
Master node
The master node manages all nodes in the cluster. If 20 or more nodes are required to store and analyze the large amount of data, you are advised to enable the master node to ensure cluster stability. Otherwise, you are advised to set only the Nodes parameter and use the nodes as both master and client nodes..
After enabling the master node, specify Node Specifications, Nodes, and Node Storage Type. The value of Nodes must be an odd number equal to or greater than 3. You can set a maximum of nine nodes. The value of Node Storage Capacity is fixed. You can select a storage type based on your needs. By default, the node storage type is High I/O and the node storage capacity is 40 GB.
Client node
The client node allows clients to access clusters and analyze data. If more than 20 nodes are required to store and analyze a large amount of data, you are advised to enable the client node to ensure cluster stability. Otherwise, you are advised to set only the Nodes parameter and use the nodes as both master and client nodes..
After enabling the client node, specify Node Specifications, Nodes and Node Storage Type. The value of Nodes ranges from 1 to 32. The value of Node Storage Capacity is fixed. You can select a storage type based on your needs. By default, the node storage type is High I/O and the node storage capacity is 40 GB.
Cold data node
The cold data node is used to store historical data, for which query responses can be returned in minutes. If you do not quire a quick query response, store historical data on cold data nodes to reduce costs.
After enabling cold data node, configure Node Specifications, Nodes, Node Storage Type, and Node Storage Capacity. The value of Nodes ranges from 1 to 32. Select Node Storage Type and Node Storage Capacity as requirement.
After the cold data node is enabled, CSS automatically adds cold and hot tags to related nodes.
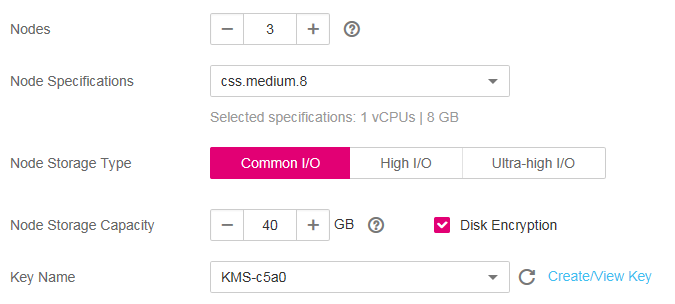
Figure 1 Configuring node specifications
Set network specifications of the cluster.
Table 5 Parameter description¶ Parameter
Description
VPC
A VPC is a secure, isolated, and logical network environment.
Select the target VPC. Click View VPC to enter the VPC management console and view the created VPC names and IDs. If no VPC is available, create a VPC.
Note
The VPC must contain CIDRs. Otherwise, cluster creation will fail. By default, a VPC will contain CIDRs.
Subnet
A subnet provides dedicated network resources that are isolated from other networks, improving network security.
Select the target subnet. You can access the VPC management console to view the names and IDs of the existing subnets in the VPC.
Security Group
A security group is a collection of access control rules for ECSs that have the same security protection requirements and are mutually trusted in a VPC. To view more details about the security group, click View Security Group.
Note
For cluster access purposes, ensure that the security group contains port 9200.
If your cluster version is 7.6.2, 7.9.3 or 7.10.2, ensure that all the ports used for communication between nodes in the same security group are allowed. If such settings cannot be configured, ensure at least the access to port 9300 is allowed.
After a cluster is created, its security group cannot be changed.
Security Mode
Security mode is disabled.
Note
You can enable Security Mode only when you create a cluster. After a cluster is created, its security mode cannot be changed.

Figure 2 Configuring network specifications
Set the enterprise project of the cluster.
When creating a CSS cluster, you can bind an enterprise project to the cluster if you have enabled enterprise project. You can select an enterprise project created by the current user from the drop-down list or click View Project Project to go to the Enterprise Project Management console and create a new project or view existing projects.
Configure automatic snapshot creation for the cluster.
By default, the cluster snapshot function is enabled. If you do not need this function, you can disable Cluster Snapshot.
Basic Configuration
OBS Bucket: name of the OBS bucket used for storing snapshots.
Backup Path: storage path of the snapshot in the OBS bucket.
IAM Agency: authorized by the current account for CSS to access or maintain data stored in the OBS bucket.
For details, see Managing Automatic Snapshot Creation.
Automatic Snapshot Creation
You can customize Snapshot Name Prefix, Backup Start Time, and Retention Period (days) as required.
Snapshot Name Prefix: Enter a maximum of 32 characters starting with a lowercase letter. Only lowercase letters, digits, hyphens (-), and underscores (_) are allowed.. A snapshot name consists of a snapshot name prefix and a timestamp. For example, snapshot-1566921603720.
Backup Started: indicates the time when the backup starts automatically every day. You can specify this parameter only in hours, for example, 00:00 or 01:00. The value ranges from 00:00 to 23:00. Select a time from the drop-down list box.
Retention Period (days): indicates the duration when snapshots are retained in the OBS bucket, in days. The value ranges from 1 to 90. You can specify this parameter as required. The system automatically deletes expired snapshots every hour at half past the hour.
Configure advanced settings for the cluster.
Default: The the VPC Endpoint Service, and Tag functions are disabled by default. You can manually enable these functions after the cluster is created.
Custom: You can enable the VPC Endpoint Service and Tag functions as required.
Table 6 Parameters for advanced settings¶ Parameter
Description
VPC Endpoint Service
After enabling this function, you can obtain a private domain name for accessing the cluster in the same VPC. For details, see VPC Endpoint Service.
Tag
Adding tags to clusters can help you identify and manage your cluster resources. You can customize tags or use tags predefined by TMS. For details, see Managing Tags.
Click Next to switch to the Confirm page.
After the specifications are confirmed, click Submit.
Click Back to Cluster List to switch to the Clusters page. The cluster you created is listed on the displayed page and its status is Creating. If the cluster is successfully created, its status will change to Available.
If the cluster creation fails, create the cluster again.