Cloud Container Engine template
Note
Released in v2.18
1. About
Launch a fully operational Cloud Container Engine (CCE) cluster with everything you need, right out of the box.
Say goodbye to complex setup scripts and hours of infrastructure toil. With Cloud Create, you can deploy a fully operational CCE cluster - complete with a NAT gateway, secure bastion host, and pre-configured kubectl client - in just one click.
Your kubectl client is ready to go right from the bastion host, giving you immediate access to manage and configure your cluster directly from our intuitive visual designer. No manual setup. No waiting.
Whether you're testing a new idea or deploying a production-grade environment, the CCE template gets you there faster, securely, and seamlessly.
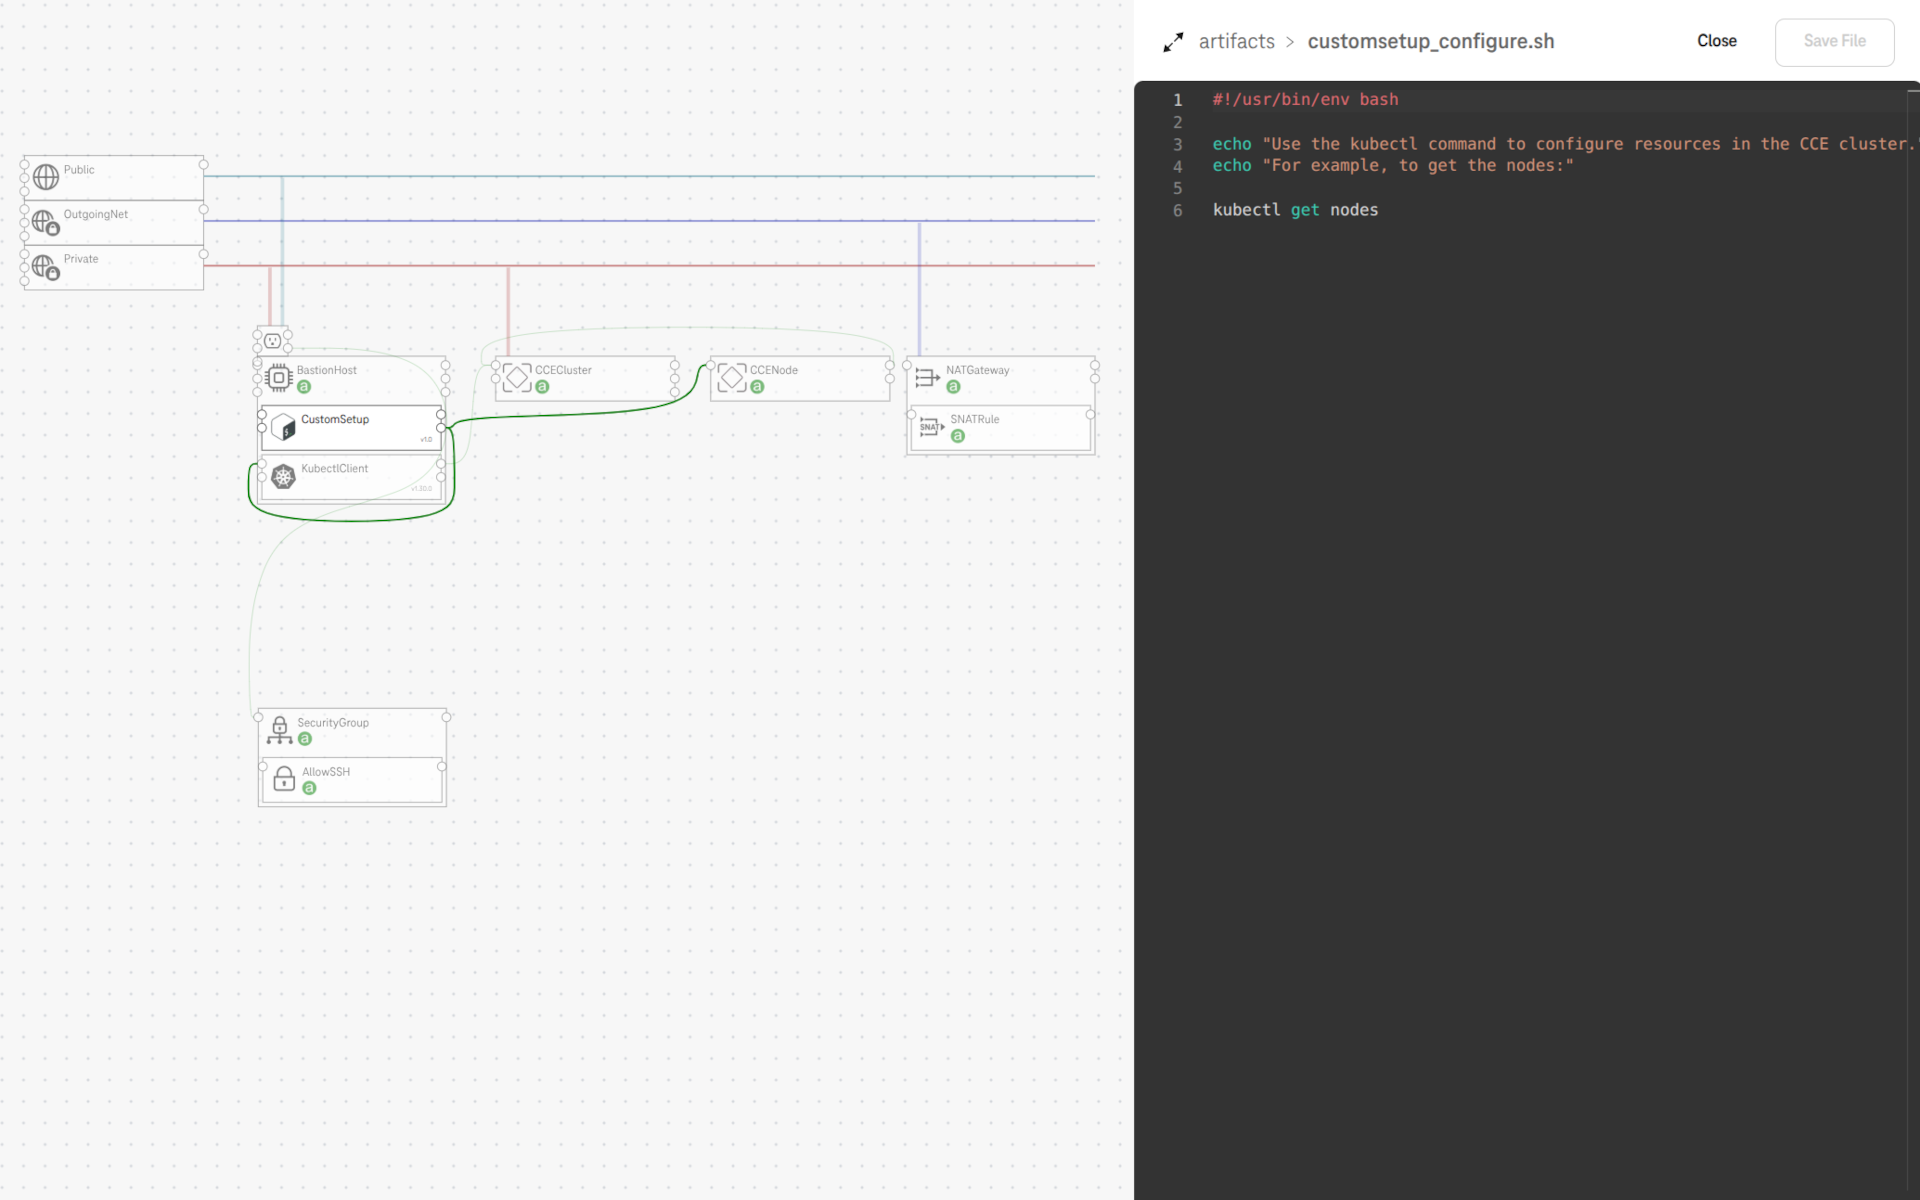
Figure 1. The CCE template
2. Quick Deploy
2.1. Enable CCE on the Web console (on first use)
If this is the first time you use CCE in a project, you have to authorize it first.
Switch to the project you want to deploy CCE / go to Cloud Container Engine.
The Web console shows an Authorization Description > Click OK.

Figure 2. Accept the Authoriztation on first use
2.2. Deploy Setup
In the Deploy Setup, you have the following inputs with default values. Change them if needed. Then Deploy.
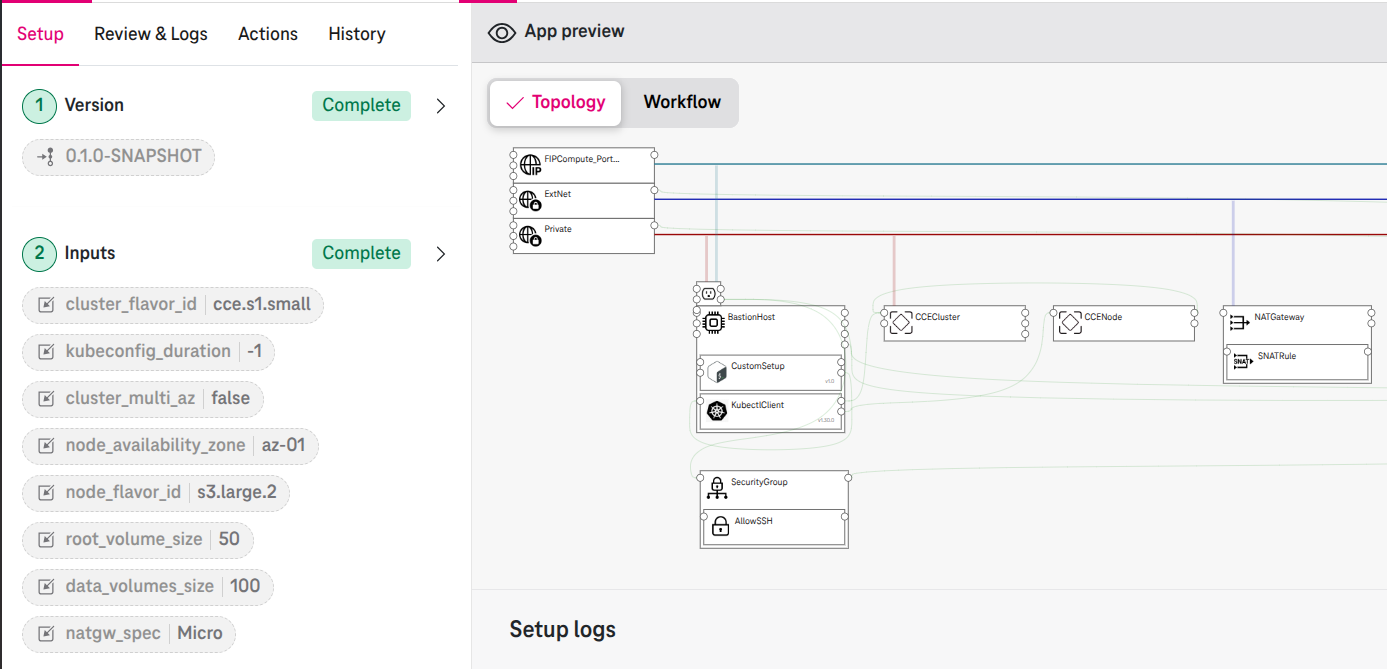
Figure 3. Deploy Setup inputs
Inputs | Description | Default value |
|---|---|---|
cluster_multi_az | Enable multiple AZs for the cluster, only when using HA flavors. | false |
cluster_flavor_id | Cluster specifications. Choose 'cce.s1.small', 'cce.s1.medium', 'cce.s2.small' for non-HA flavors. Choose 'cce.s2.medium', 'cce.s2.large', 'cce.s2.xlarge' for HA flavors. | 'cce.s1.small' |
kubeconfig_duration | Period during which the cluster certificate of the kubeconfig file is valid, in days. After this period, the kubeconfig file is invalid and kubectl client cannot use it to connect to the CCE cluster. The certificate can be valid for 1 to 1825 days. If this parameter is set to -1, the validity period is 1825 days (about 5 years). If this parameter is set to 0, we will not auto-generate the kubeconfig file for you. | -1 |
node_flavor_id | Specifies the flavor id for the worker node. | 's3.large.2' |
node_availability_zone | Specifies the name of the available zone ('az-01', 'az-02', 'az-03'). The AZs will be mapped to the coresponding AZs in the region you deploy (e.g., 'az-01' maps to 'eu-de-01' for region EU-DE). | 'az-01' |
root_volume_size | Specifies size of the system disk in GB. | 50 |
data_volumes_size | Specifies size of the data disk in GB. | 100 |
3. Advanced Setup
3.1. How to control the k8s resources from the designer
In the designer:
Put any scripts on the Bastionhost (e.g., the CustomSetup script).
In the script, you can use the kubectl command to control the k8s resources of your cluster directly. For example, the following script gets all k8s nodes:
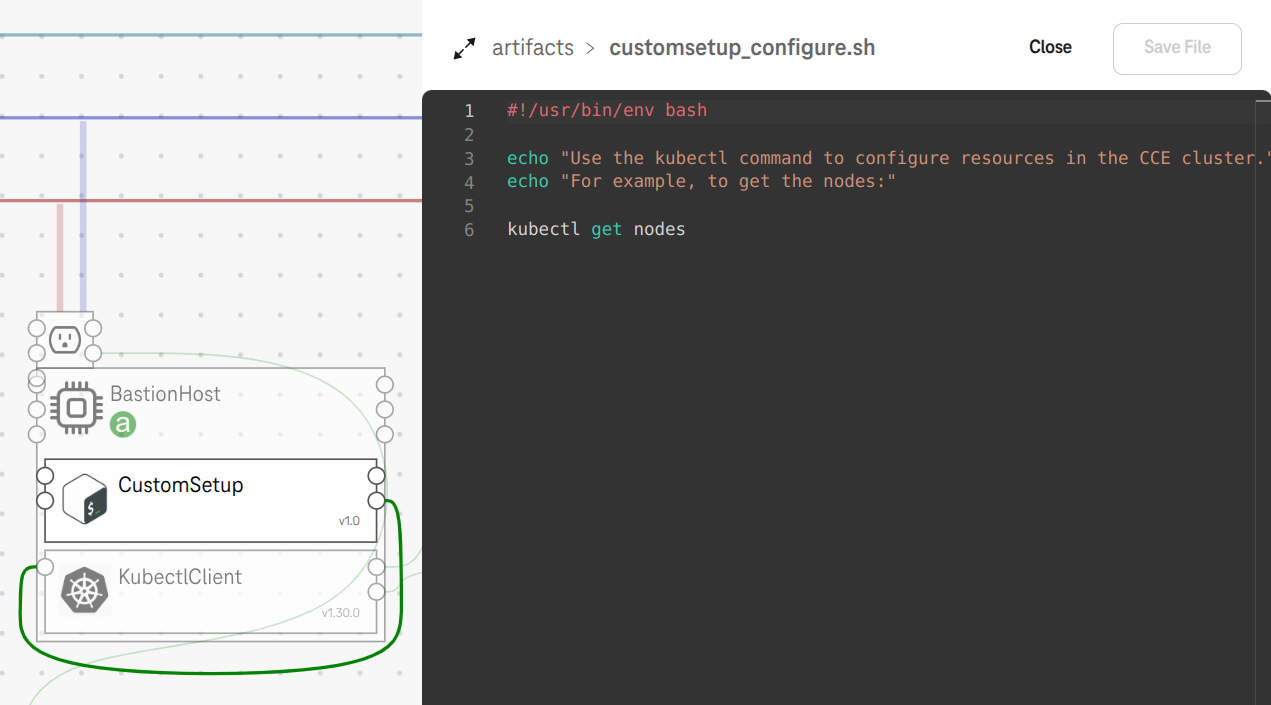
Figure 4. The CustomSetup script
Expect result
After deployment completes, click on the CustomSetup script to see the output:
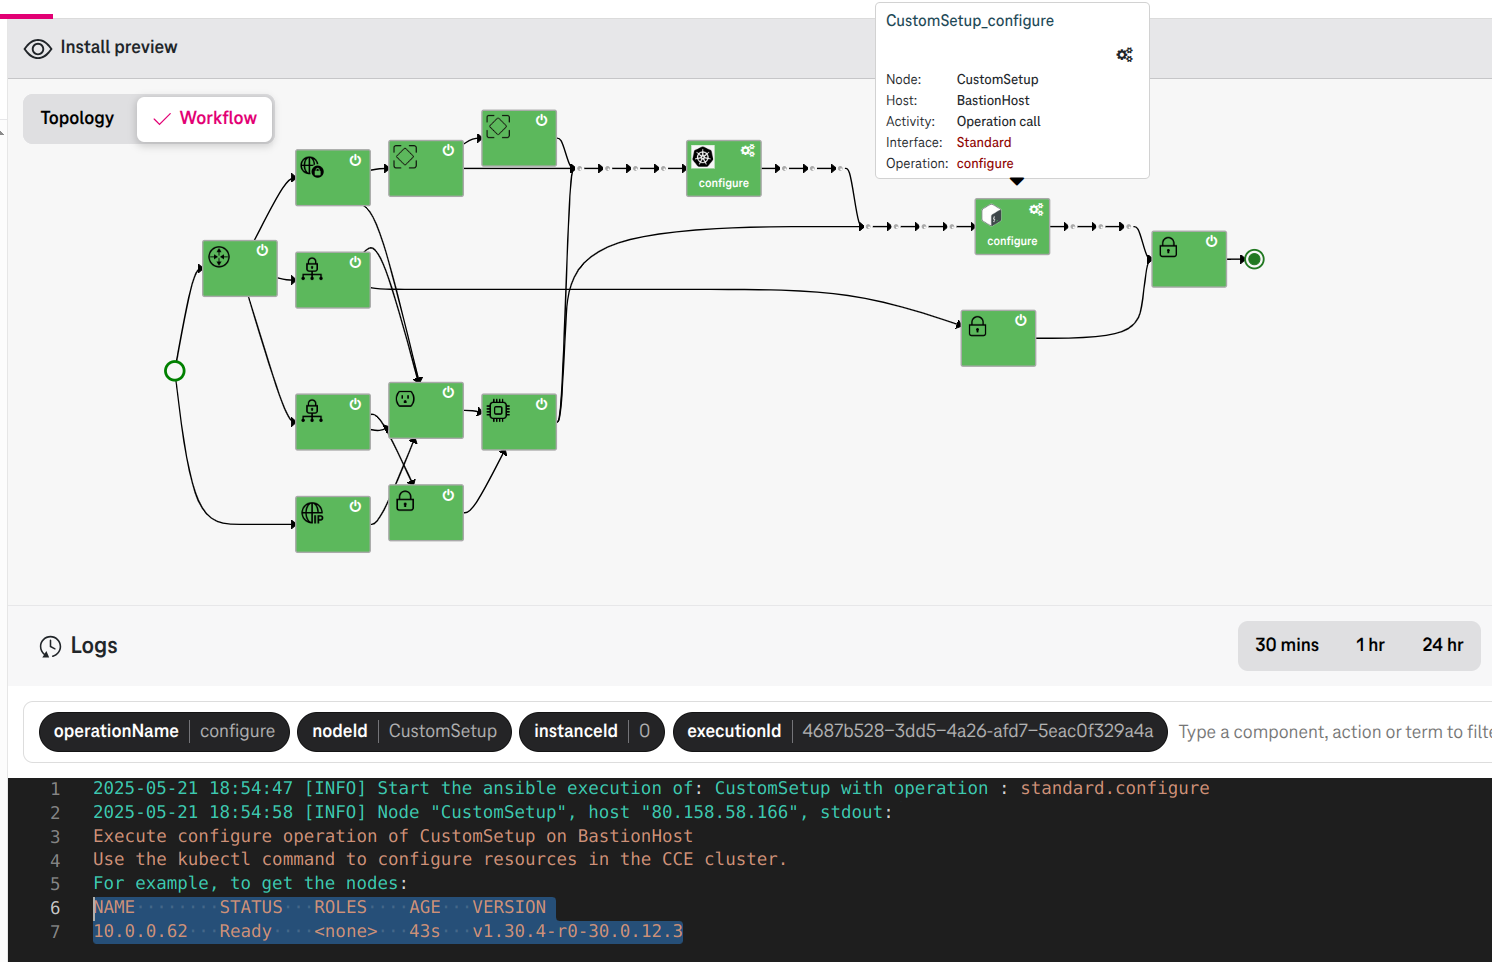
Figure 5. The CustomSetup script outputs all k8s nodes
3.2. How to assign an EIP to the CCE cluster
Click on the CCECluster node.
Connect the
eipto the Public network.
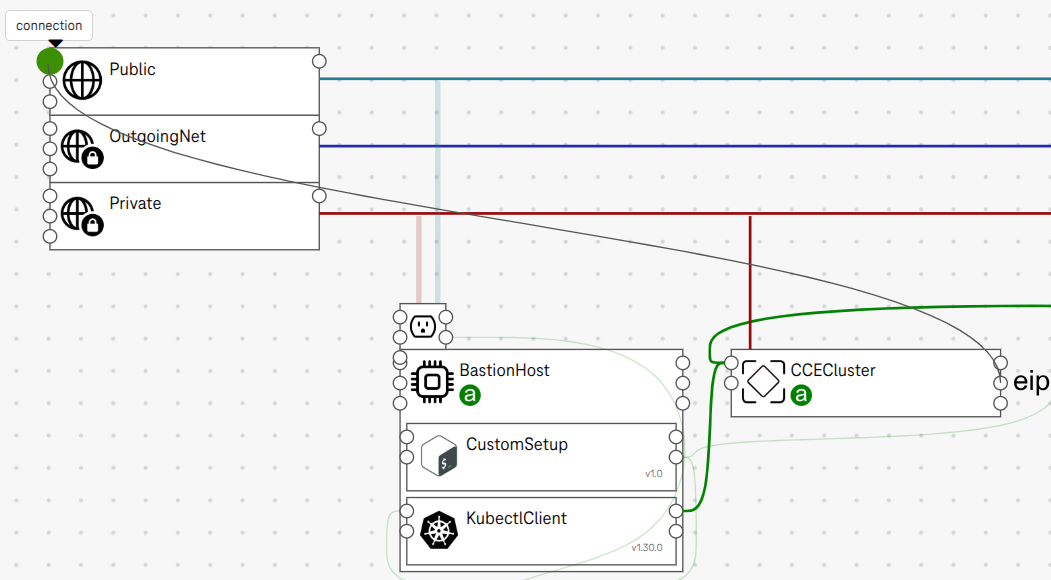
Figure 6. Connect eip to the Public network
Expect result
The K8s APIs of your CCE cluster will be available for public access via the EIP.
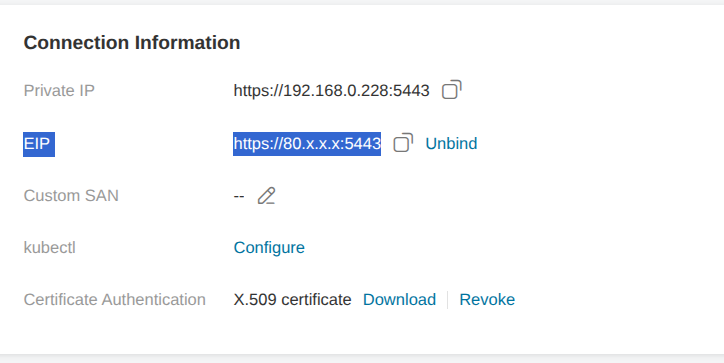
Figure 7. The CCE cluster has an EIP 80.x.x.x assigned
3.3. How to scale an existing CCE node
The CCE node in the template has one instance by default. You can scale it up, e.g., to 2 instances as follows:
Click on the CCENode.
Specify the
default_instances(e.g., 2) andmax_instances(e.g., 10).
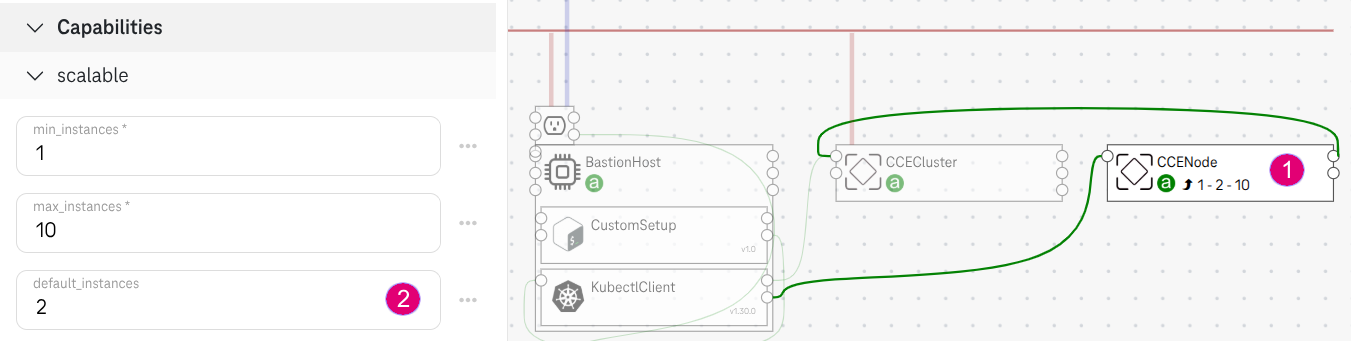
Figure 8. Scale the CCENode to 2 instances
Expect result
After the deployment completes, you will have two instances ccenode-0 and ccenode-1. They have the same settings (e.g., same flavor, availability zone, volume size, etc.).

Figure 9. Result
3.4. How to add a new CCE node to the CCE cluster
The template has one CCENode by default. You can add a new CCE node to the cluster but with a different setting (e.g., different flavor, availability zone, volume size, etc.):
Drag-n-drop the CCENode.
Connect the new CCENode (e.g.,
CCENode_2) to the CCECluster.
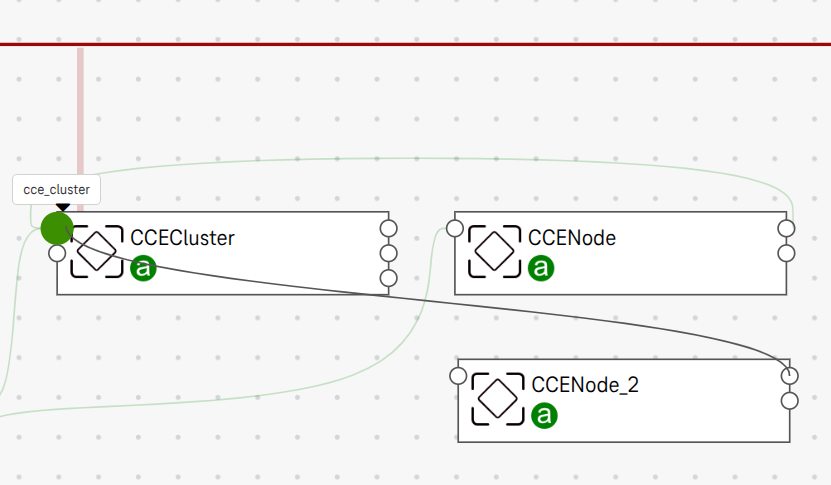
Figure 10. Add CCENode_2 to the CCECluster
3.5. How to update the plugins
In the designer:
Click on a CCECluster / Set annotations.
The default annotation
cluster.install.addons.external/installinstalls theicagent. Update or remove the annocation as needed.
cluster.install.addons.external/install: [{"addonTemplateName":"icagent"}]"
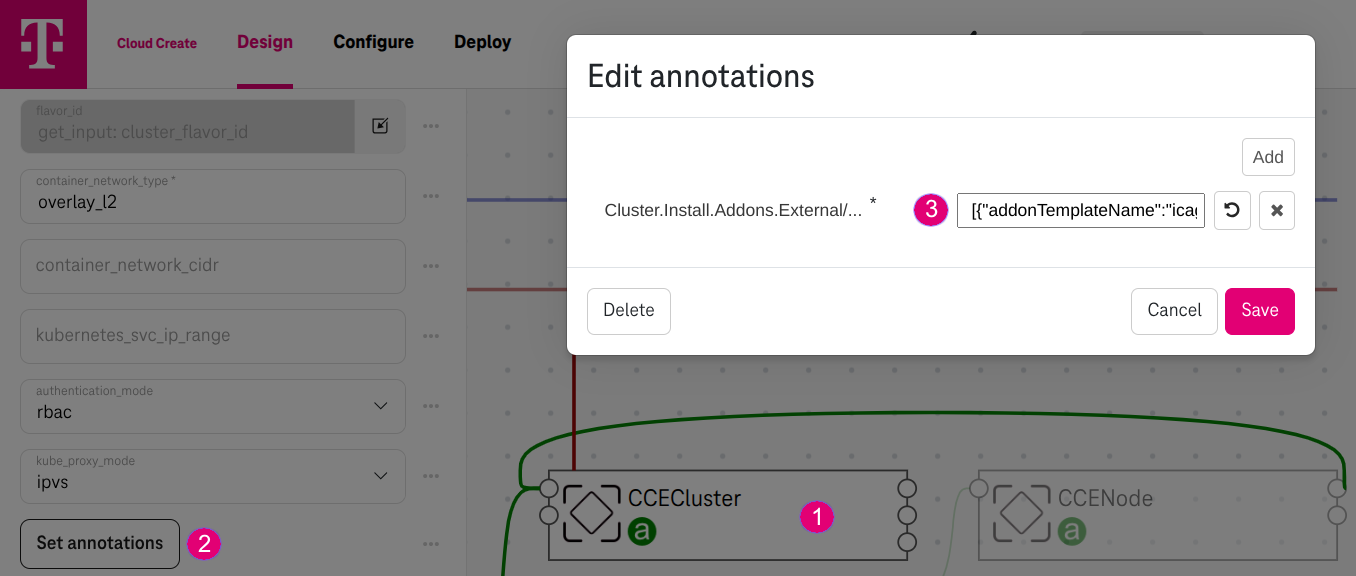
Figure 11. Default annotation
3.6. How to set labels for a CCE node
In the designer:
Click on a CCENode / Set k8s_tags.
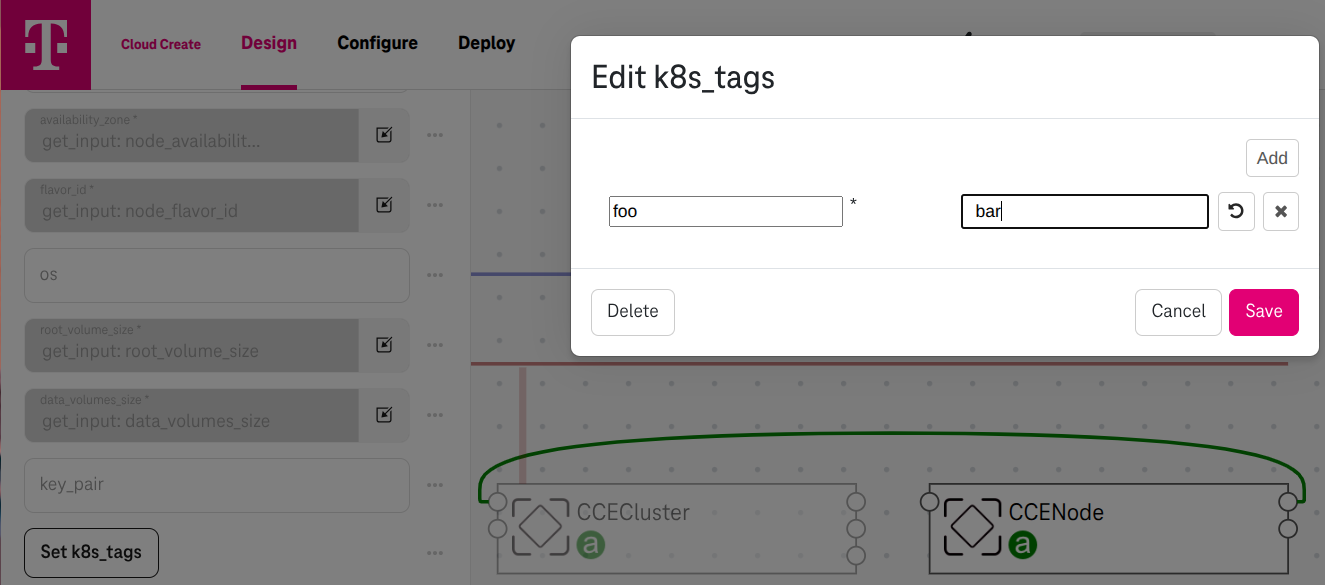
Figure 12. Set the tag "foo" with value "bar" for a CCENode
Expect result
After deployment completes, go to Nodes / More / Manage label and see the tags:
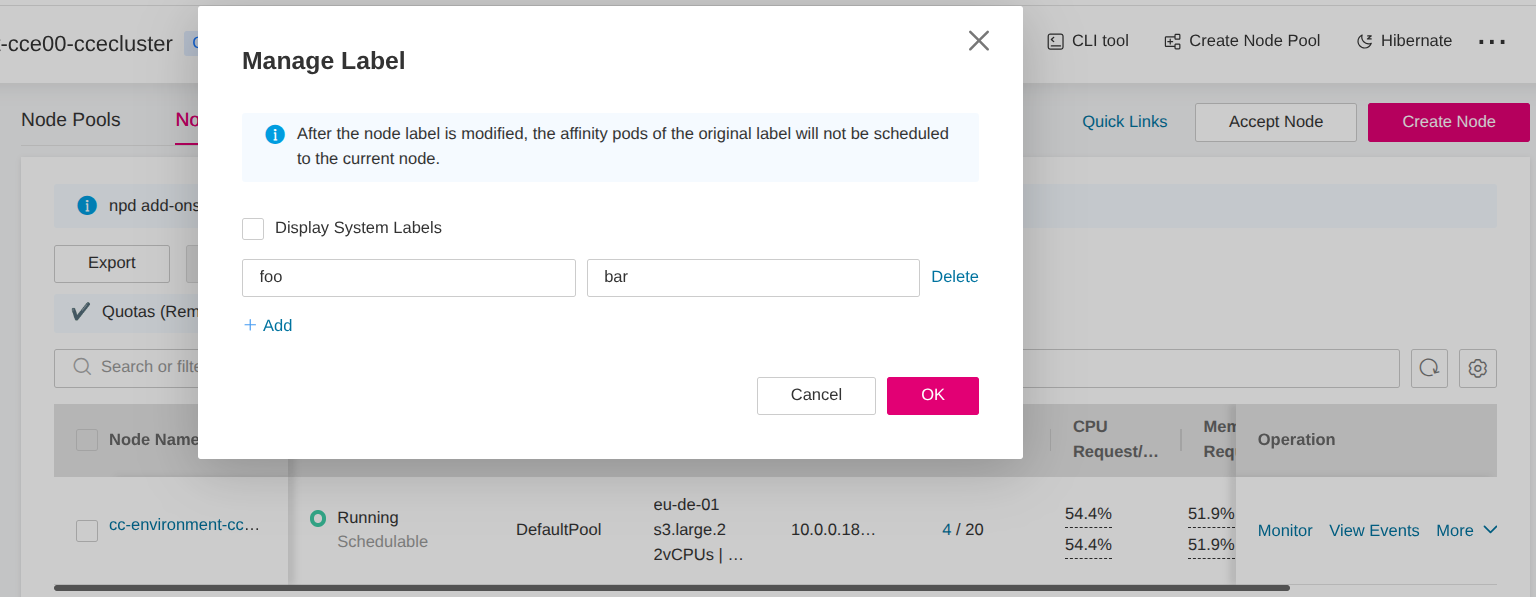
Figure 13. Label "foo" with value "bar" is set
4. Access the bastion host
After the deployment completes, you can SSH to the bastion host
ssh ubuntu@<bastion_host_public_address>
And use the kubectl command
ubuntu@cc-environment-cce01-bastionhost-0:~$ kubectl get nodes
NAME        STATUS   ROLES    AGE     VERSION
10.0.0.62   Ready    <none>   7m23s   v1.30.4-r0-30.0.12.3
5. Deployment update
You can update the current deployment from one version to another one:
Clone the current version (e.g.,
0.1.0-SNAPSHOTis currently deployed) by clicking on Clone this application
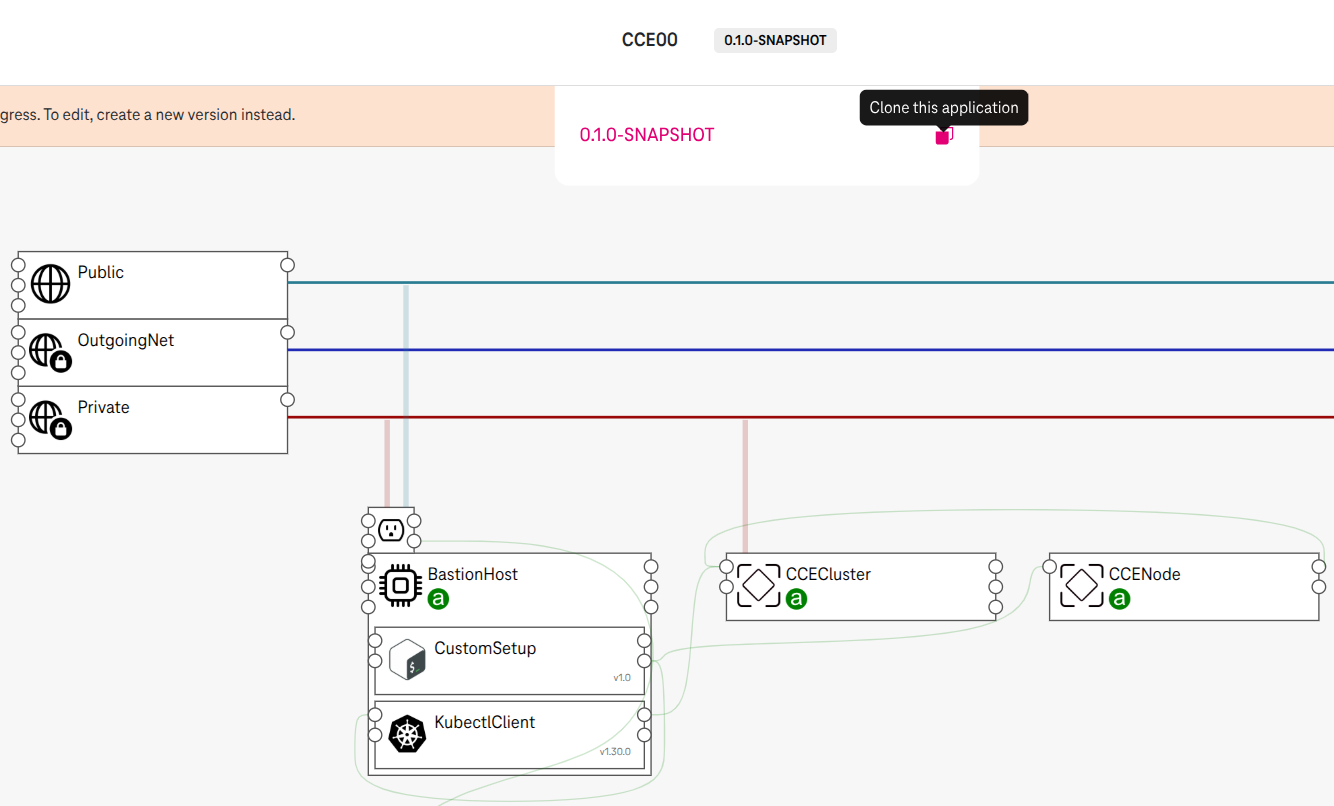
Figure 14. Clone the version 0.1.0-SNAPSHOT
In the new version (
0.1.1-SNAPSHOT), make any changes in the design (e.g., add a new node).

Figure 15. Add a new node CCENode_az2
Go to Deploy Setup / Select the target Version to update (
0.1.1-SNAPSHOT).Review the differences between the two versions, if any nodes are added/removed, or any properties have been changed as expected.
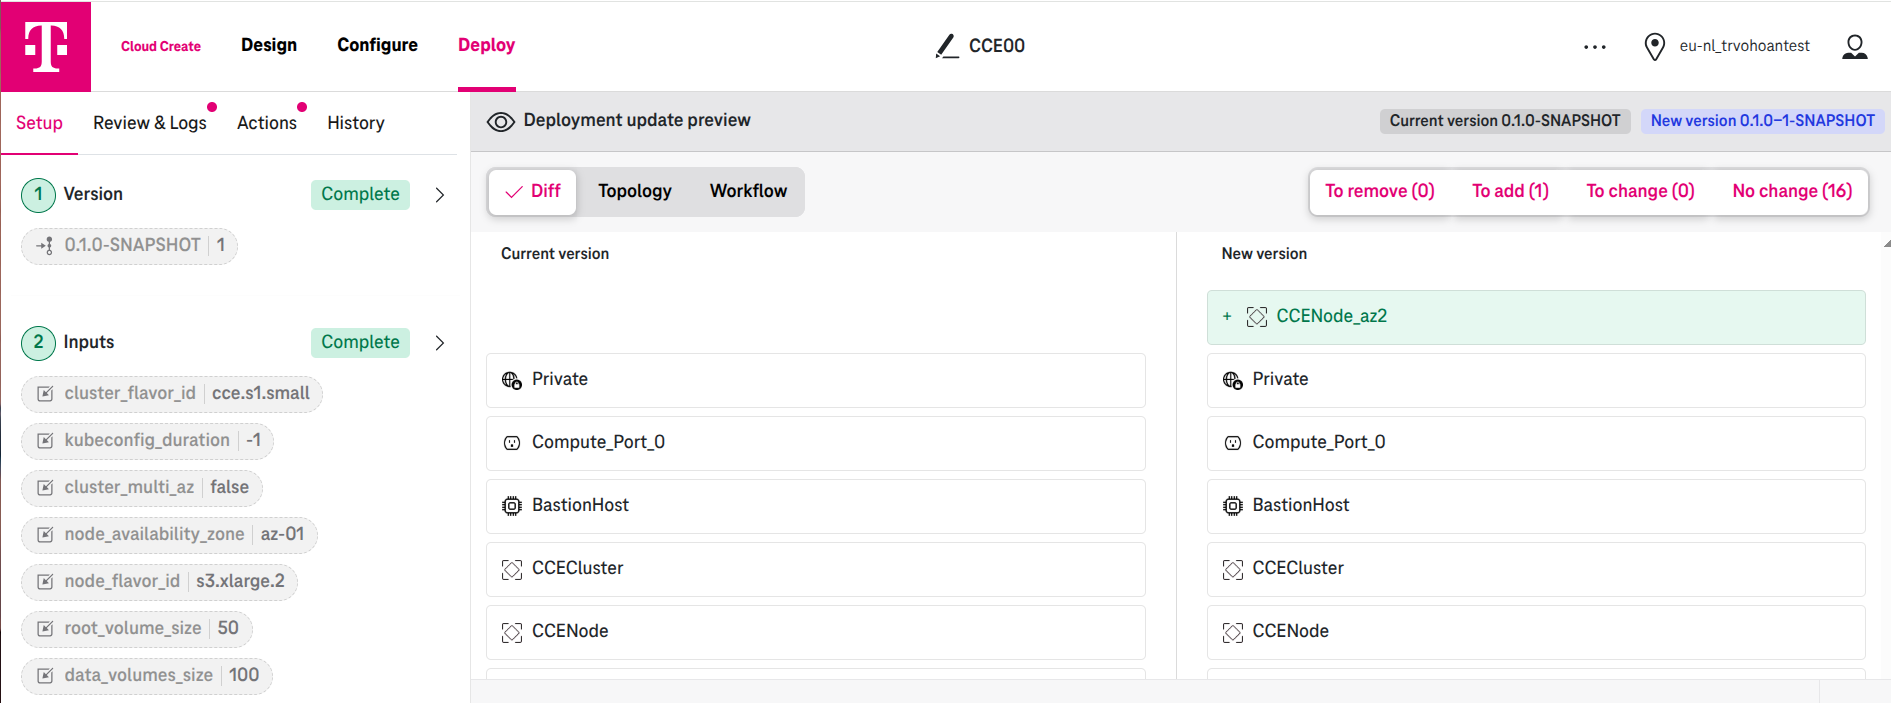
Figure 16. The table shows a new node CCENode_az2 will be added
Click Update and review the result
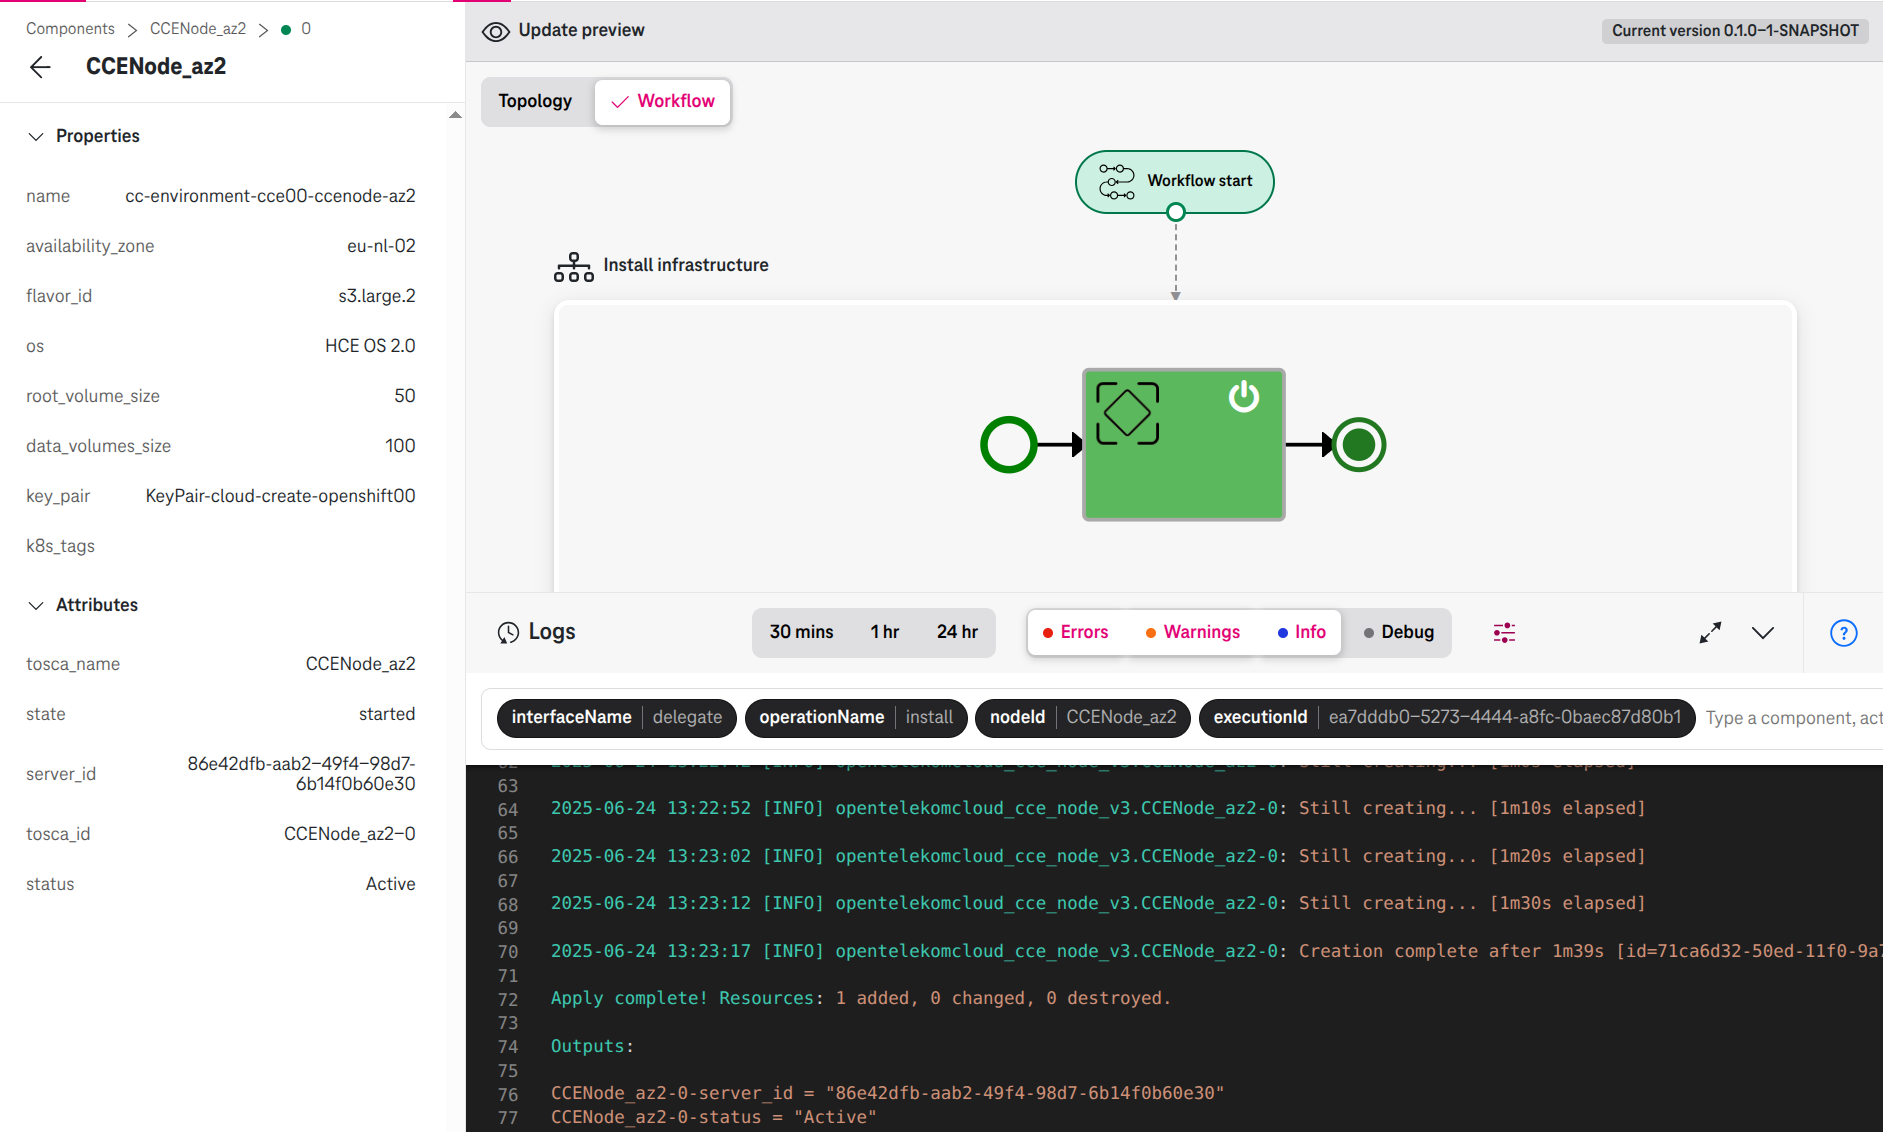
Figure 17. The new node CCENode_az2 is installed