Creating a Namespace
Namespaces are used to logically divide your resources into different groups, especially in scenarios where a large number of users from multiple teams work on different projects.
CCI provides general computing resources and allows you to create pods with CPU resources for general computing.
Note
One account can create a maximum of five namespaces in a region.
x86 images are supported.
Relationship Between Namespaces and Networks
Each namespace requires a separate subnet, as shown in Figure 1. When you create a namespace, you need to associate it with a VPC. A subnet will be created for the namespace in the VPC. Containers and other resources created in this namespace will run in the VPC and subnet you select.
If you want to run resources of multiple services in the same VPC, you need to consider network planning, including subnet CIDR block division and IP address planning.
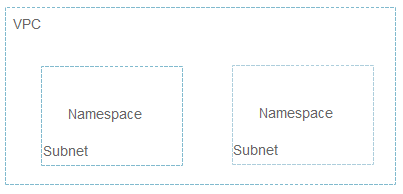
Figure 1 Relationship between namespaces and VPC subnets
Application Scenarios
Namespaces can implement partial environment isolation. If you have a large number of projects and personnel, you can create different namespaces based on project attributes, such as production, test, and development.
Creating a Namespace
Log in to the CCI console. In the navigation pane on the left, choose Namespaces.
On the Namespaces page, click Create Namespace in the upper right corner.
Enter a name for the namespace.
Note
The name of each namespace must be unique in CCI.
Enter 1 to 63 characters. Start and end with a lowercase letter or digit. Use only lowercase letters, digits, and hyphens (-).
Configure the network plane.
Table 1 Network plane settings¶ Parameter
Description
IPv6
If this option is enabled, IPv4/IPv6 dual stack is supported.
VPC
Select the VPC where the workloads are running. If no VPC is available, create one first. The VPC cannot be changed once selected.
Recommended CIDR blocks: 10.0.0.0/8-22, 172.16.0.0/12-22, and 192.168.0.0/16-22
Important
NOTICE: 10.247.0.0/16 is reserved for workloads. If you select this CIDR block, IP address conflicts may occur, which may result in workload creation failure or service unavailability. However, if you do not need to access pods through workloads, you can select this CIDR block.
After the namespace is created, you can view the VPC and subnet by choosing Namespaces > Subnet.
Subnet
Select the subnet where the workloads are running. If no subnet is available, create one first. The subnet cannot be changed once selected.
Some IP addresses (10 by default) in the subnet will be warmed up for the namespace.
You can set the number of IP addresses to be warmed up in Advanced Settings.
If warming up IP addresses for the namespace is enabled, the VPC and subnet can only be deleted after the namespace is deleted.
Note
Sufficient available IP addresses in the subnet are required for creating workloads.
Security Group
Select a security group. If no security group is available, create one first. The security group cannot be changed once selected.
(Optional) Advanced Settings
Each namespace provides an IP pool. You can specify the pool size to reduce the duration for assigning IP addresses and speed up the workload creation.
For example, 200 pods are running routinely, and 200 IP addresses are required in the IP pool. During peak hours, the IP pool instantly scales out to provide 500 IP addresses. After a specified interval (for example, 23 hours), the IP addresses that exceed the pool size (500 - 200 = 300) will be recycled.
Table 2 Advanced namespace settings¶ Parameter
Description
IP Pool Warm-up for Namespace
An IP pool is provided for each namespace, with the number of IP addresses you specify here, and IP addresses will be assigned in advance to accelerate workload creation.
An IP pool can contain a maximum of 500 IP addresses.
IP Address Recycling Interval (h)
Warmed-up IP addresses that become idle can be recycled within the duration you specify here.
Click OK.
You can view the VPC and subnet on the namespace details page.
Deleting a Namespace
Important
Deleting a namespace will delete all resources (such as pods, ConfigMaps, and secrets) related to the namespace.
Cascading deletion of workloads and services is not supported after a namespace is deleted.
After a namespace is deleted, if a namespace with the same name is created immediately, 409 Conflict may be returned because it takes a while to delete a namespace. Create the namespace about 30 seconds later.
Log in to the CCI console. In the navigation pane on the left, choose Namespaces.
On the Namespaces page, locate the namespace you want to delete and click Delete in the Operation column. In the Delete Namespace dialog box, enter DELETE and click OK.
Note
To delete a VPC or subnet, go to the VPC console.