Scheduling Policies (Affinity/Anti-affinity)
Kubernetes supports node affinity and pod affinity/anti-affinity. You can configure custom rules to achieve affinity and anti-affinity scheduling. For example, you can deploy frontend pods and backend pods together, deploy the same type of applications on a specific node, or deploy different applications on different nodes.
Kubernetes affinity applies to nodes and pods.
nodeAffinity: similar to pod nodeSelector, and they both schedule pods only to the nodes with specified labels. The difference between nodeAffinity and nodeSelector lies in that nodeAffinity features stronger expression than nodeSelector and allows you to specify preferentially selected soft constraints. The two types of node affinity are as follows:
requiredDuringSchedulingIgnoredDuringExecution: hard constraint that must be met. The scheduler can perform scheduling only when the rule is met. This function is similar to nodeSelector, but it features stronger syntax expression. For details, see Node Affinity (nodeAffinity).
preferredDuringSchedulingIgnoredDuringExecution: soft constraint that is met as much as possible. The scheduler attempts to find the node that meets the rule. If no matching node is found, the scheduler still schedules the pod. For details, see Node Preference Rules.
Workload Affinity (podAffinity)/Workload Anti-affinity (podAntiAffinity): The nodes to which a pod can be scheduled are determined based on the label of the pod running on a node, but not the label of the node. Similar to node affinity, workload affinity and anti-affinity are also of requiredDuringSchedulingIgnoredDuringExecution and preferredDuringSchedulingIgnoredDuringExecution types.
Note
Workload affinity and anti-affinity require a certain amount of computing time, which significantly slows down scheduling in large-scale clusters. Do not enable workload affinity and anti-affinity in a cluster that contains hundreds of nodes.
You can create the preceding affinity policies on the console. For details, see Configuring Load Affinity on the Console and Configuring Node Affinity on the Console.
Configuring Load Affinity on the Console
When creating a workload, click Scheduling in the Advanced Settings area. For details about how to create a workload, see Creating a Workload.
Select a load affinity scheduling policy.
Not configured: No load affinity policy is configured.
Multi-AZ deployment preferred: Workload pods are preferentially scheduled to nodes in different AZs through pod anti-affinity.
Forcible multi-AZ deployment: Workload pods are forcibly scheduled to different AZs and different nodes through pod anti-affinity. When this scheduling policy is used, if there are fewer nodes than pods or node resources are insufficient, the extra pods will fail to run.
Custom policies: allow flexible scheduling of workload pods based on pod labels. For details about the supported scheduling policies, see Table 1. Select a proper policy type and click
 to add a policy. For details about the parameters, see Table 2.
Table 1 Load affinity policies¶ Policy
Type
Description
Workload Affinity
Required
Hard constraint, which is used to configure the conditions that must be met and corresponds to the requiredDuringSchedulingIgnoredDuringExecution field in YAML.
Select pods that require affinity by label. If such pods have been running on a node in the topology domain, the scheduler will forcibly schedule the created pods to that topology domain.
Note
If multiple affinity rules are configured, multiple labels will be used to filter pods that require affinity, and the newly created pods must be affinity with all pods that meet the label filtering conditions. In this way, all pods that meet the label filtering conditions locate in the same topology domain for scheduling.
Preferred
Soft constraint, which is used to configure the conditions that preferentially to be met and corresponds to the preferredDuringSchedulingIgnoredDuringExecution field in YAML.
Select pods that require affinity by label. If such pods have been running on a node in the topology domain, the scheduler will preferentially schedule the created pods to that topology domain.
Note
If multiple affinity rules are configured, multiple labels will be used to filter pods that require affinity, and the newly created pods will be preferentially to be affinity with multiple pods that meet the label filtering conditions. However, even if no pod meets the label filter conditions, a topology domain will be selected for scheduling.
Workload Anti-Affinity
Required
Hard constraint, which corresponds to requiredDuringSchedulingIgnoredDuringExecution in YAML for specifying the conditions that must be met.
Select one or more pods that require anti-affinity by label. If such pods have been running on a node in the topology domain, the scheduler will not schedule the created pods to that topology domain.
Note
If multiple anti-affinity rules are configured, multiple labels will be used to filter pods that require anti-affinity, and the newly created pods must be anti-affinity with all pods that meet the label filtering conditions. In this way, all the topology domains where the pods that meet the label filtering conditions locate will not be scheduled.
Preferred
Soft constraint, which corresponds to preferredDuringSchedulingIgnoredDuringExecution in YAML for specifying the conditions that are preferentially met.
Select one or more pods that require anti-affinity by label. If such pods have been running on a node in the topology domain, the scheduler will preferentially schedule the created pods to other topology domains.
Note
If multiple anti-affinity rules are configured, multiple labels will be used to filter pods that require anti-affinity, and the newly created pods will be preferentially to be anti-affinity with multiple pods that meet the label filtering conditions. However, even if all topology domains involve the pods that require anti-affinity, a topology domain will be selected for scheduling.
Table 2 Parameters for configuring load affinity/anti-affinity scheduling policies¶ Parameter
Description
Weight
This parameter is available only in a Preferred scheduling policy. The weight ranges from 1 to 100. During scheduling, the scheduler adds the weight to the scores of other priority functions and schedules pods to the node with the largest total score.
Namespace
Namespace for which the scheduling policy takes effect.
Topology Key
A topology domain (topologyKey) determines the range of nodes to be scheduled based on node labels. For example, if the node label is kubernetes.io/hostname, the range of nodes is determined by node name. Nodes with different names are in different topology domains. In this case, a topology domain contains only one node. If the specified label is kubernetes.io/os, the range of nodes is determined by node OS. Nodes running different OSs belong to different topology domains. In this case, a topology domain may contain multiple nodes.
After the node range is determined using the topology domain, configure the policy for scheduling, including the label name, operator, and label value. The minimum unit for scheduling is a topology domain. For example, if a node in a topology domain meets the load affinity policy, all nodes in the topology domain can be scheduled.
Label Key
When configuring a workload affinity or anti-affinity policy, enter the workload label to be matched.
Both default labels and custom labels are supported.
Operator
The following operators are supported:
In: The label of the affinity or anti-affinity object is in the label value list (values field).
NotIn: The label of the affinity or anti-affinity object is not in the label value list (values field).
Exists: The affinity or anti-affinity object has a specified label name.
DoesNotExist: The affinity or anti-affinity object does not have the specified label name.
Label Value
When configuring a workload affinity or anti-affinity policy, enter the value of the workload label.
After the scheduling policy is added, click Create Workload.
Configuring Node Affinity on the Console
When creating a workload, click Scheduling in the Advanced Settings area. For details about how to create a workload, see Creating a Workload.
Select a node affinity scheduling policy.
Not configured: No node affinity policy is configured.
Node Affinity: Specify the nodes where workload pods are to be deployed. If no nodes are specified, the pods will be randomly scheduled based on the default cluster scheduling policy.
Specified Node Pool Scheduling: Specify the node pools where workload pods are to be deployed. If no node pools are specified, the pods will be randomly scheduled based on the default cluster scheduling policy.
Custom policies: allow flexible scheduling of workload pods based on node labels. For details about the supported scheduling policies, see Table 3. Select a proper policy type and click
 to add a policy. For details about the parameters, see Table 4. You can also click Specify Node or Specify AZ to quickly select a node or AZ on the console for scheduling.
Specifying a node or AZ is also implemented through labels. The console frees you from manually entering node labels. The kubernetes.io/hostname label is used when you specify a node, and the failure-domain.beta.kubernetes.io/zone label is used when you specify an AZ.
Table 3 Node affinity settings¶ Parameter
Description
Required
Hard constraint, which corresponds to requiredDuringSchedulingIgnoredDuringExecution for specifying the conditions that must be met.
If multiple rules that must be met are added, scheduling will be performed when only one rule is met.
Preferred
Soft constraint, which corresponds to preferredDuringSchedulingIgnoredDuringExecution for specifying the conditions that are preferentially met.
If multiple rules that are preferentially met are added, scheduling will be performed even if one or none of the rules is met.
Table 4 Parameters for configuring node affinity scheduling policies¶ Parameter
Description
Label
When configuring node affinity, enter the node label to be matched.
Both default labels and custom labels are supported.
Operator
The following operators are supported:
In: The label of the affinity or anti-affinity object is in the label value list (values field).
NotIn: The label of the affinity or anti-affinity object is not in the label value list (values field).
Exists: The affinity or anti-affinity object has a specified label name.
DoesNotExist: The affinity or anti-affinity object does not have the specified label name.
Gt: (available only for node affinity) The label value of the scheduled node is greater than the list value (string comparison).
Lt: (available only for node affinity) The label value of the scheduled node is less than the list value (string comparison).
Label Value
When configuring node affinity, enter the value of the node label.
After the scheduling policy is added, click Create Workload.
Node Affinity (nodeAffinity)
Workload node affinity rules are implemented using node labels. When a node is created in a CCE cluster, certain labels are automatically added. You can run the kubectl describe node command to view the labels. The following is an example:
$ kubectl describe node 192.168.0.212
Name:               192.168.0.212
Roles:              <none>
Labels:             beta.kubernetes.io/arch=amd64
                    beta.kubernetes.io/os=linux
                    failure-domain.beta.kubernetes.io/is-baremetal=false
                    failure-domain.beta.kubernetes.io/region=******
                    failure-domain.beta.kubernetes.io/zone=******
                    kubernetes.io/arch=amd64
                    kubernetes.io/availablezone=******
                    kubernetes.io/eniquota=12
                    kubernetes.io/hostname=192.168.0.212
                    kubernetes.io/os=linux
                    node.kubernetes.io/subnetid=fd43acad-33e7-48b2-a85a-24833f362e0e
                    os.architecture=amd64
                    os.name=EulerOS_2.0_SP5
                    os.version=3.10.0-862.14.1.5.h328.eulerosv2r7.x86_64
In workload scheduling, common node labels are as follows:
failure-domain.beta.kubernetes.io/region: region where the node is located.
failure-domain.beta.kubernetes.io/zone: availability zone to which the node belongs.
kubernetes.io/hostname: host name of the node.
Kubernetes provides the nodeSelector field. When creating a workload, you can set this field to specify that the pod can be deployed only on a node with the specific label. The following example shows how to use a nodeSelector to deploy the pod only on the node with the gpu=true label.
apiVersion: v1
kind: Pod
metadata:
  name: nginx
spec:
  nodeSelector:                 # Node selection. A pod is created on a node only when the node meets gpu=true.
    gpu: true
...
Node affinity rules can achieve the same results. Compared with nodeSelector, node affinity rules seem more complex, but with a more expressive syntax. You can use the spec.affinity.nodeAffinity field to set node affinity. There are two types of node affinity:
requiredDuringSchedulingIgnoredDuringExecution: Kubernetes cannot schedule the pod unless the rule is met.
PreferredDuringSchedulingIgnoredDuringExecution: Kubernetes tries to find a node that meets the rule. If a matching node is not available, Kubernetes still schedules the pod.
Note
In these two types of node affinity, requiredDuringScheduling or preferredDuringScheduling indicates that the pod can be scheduled to a node only when all the defined rules are met (required). IgnoredDuringExecution indicates that if the node label changes after Kubernetes schedules the pod, the pod continues to run and will not be rescheduled. However, if kubelet on the node is restarted, kubelet will recheck the node affinity rule, and the pod will still be scheduled to another node.
The following is an example of setting node affinity:
apiVersion: apps/v1
kind: Deployment
metadata:
  name:  gpu
  labels:
    app:  gpu
spec:
  selector:
    matchLabels:
      app: gpu
  replicas: 3
  template:
    metadata:
      labels:
        app:  gpu
    spec:
      containers:
      - image:  nginx:alpine
        name:  gpu
        resources:
          requests:
            cpu: 100m
            memory: 200Mi
          limits:
            cpu: 100m
            memory: 200Mi
      imagePullSecrets:
      - name: default-secret
      affinity:
        nodeAffinity:
          requiredDuringSchedulingIgnoredDuringExecution:
            nodeSelectorTerms:
            - matchExpressions:
              - key: gpu
                operator: In
                values:
                - "true"
In this example, the scheduled node must contain a label with the key named gpu. The value of operator is to In, indicating that the label value must be in the values list. That is, the key value of the gpu label of the node is true. For details about other values of operator, see Operator Values. Note that there is no such thing as nodeAntiAffinity because operators NotIn and DoesNotExist provide the same function.
The following describes how to check whether the rule takes effect. Assume that a cluster has three nodes.
$ kubectl get node
NAME            STATUS   ROLES    AGE   VERSION
192.168.0.212   Ready    <none>   13m   v1.15.6-r1-20.3.0.2.B001-15.30.2
192.168.0.94    Ready    <none>   13m   v1.15.6-r1-20.3.0.2.B001-15.30.2
192.168.0.97    Ready    <none>   13m   v1.15.6-r1-20.3.0.2.B001-15.30.2
Add the gpu=true label to the 192.168.0.212 node.
$ kubectl label node 192.168.0.212 gpu=true
node/192.168.0.212 labeled

$ kubectl get node -L gpu
NAME            STATUS   ROLES    AGE   VERSION                            GPU
192.168.0.212   Ready    <none>   13m   v1.15.6-r1-20.3.0.2.B001-15.30.2   true
192.168.0.94    Ready    <none>   13m   v1.15.6-r1-20.3.0.2.B001-15.30.2
192.168.0.97    Ready    <none>   13m   v1.15.6-r1-20.3.0.2.B001-15.30.2
Create the Deployment. You can find that all pods are deployed on the 192.168.0.212 node.
$ kubectl create -f affinity.yaml
deployment.apps/gpu created

$ kubectl get pod -o wide
NAME                     READY   STATUS    RESTARTS   AGE   IP            NODE
gpu-6df65c44cf-42xw4     1/1     Running   0          15s   172.16.0.37   192.168.0.212
gpu-6df65c44cf-jzjvs     1/1     Running   0          15s   172.16.0.36   192.168.0.212
gpu-6df65c44cf-zv5cl     1/1     Running   0          15s   172.16.0.38   192.168.0.212
Node Preference Rules
The preceding requiredDuringSchedulingIgnoredDuringExecution rule is a hard selection rule. There is another type of selection rule, that is, preferredDuringSchedulingIgnoredDuringExecution. It is used to specify which nodes are preferred during scheduling.
To achieve this effect, add a node attached with SAS disks to the cluster, add the DISK=SAS label to the node, and add the DISK=SSD label to the other three nodes.
$ kubectl get node -L DISK,gpu
NAME            STATUS   ROLES    AGE     VERSION                            DISK     GPU
192.168.0.100   Ready    <none>   7h23m   v1.15.6-r1-20.3.0.2.B001-15.30.2   SAS
192.168.0.212   Ready    <none>   8h      v1.15.6-r1-20.3.0.2.B001-15.30.2   SSD      true
192.168.0.94    Ready    <none>   8h      v1.15.6-r1-20.3.0.2.B001-15.30.2   SSD
192.168.0.97    Ready    <none>   8h      v1.15.6-r1-20.3.0.2.B001-15.30.2   SSD
Define a Deployment. Use the preferredDuringSchedulingIgnoredDuringExecution rule to set the weight of nodes with the SSD disk installed as 80 and nodes with the gpu=true label as 20. In this way, pods are preferentially deployed on the nodes with the SSD disk installed.
apiVersion: apps/v1
kind: Deployment
metadata:
  name:  gpu
  labels:
    app:  gpu
spec:
  selector:
    matchLabels:
      app: gpu
  replicas: 10
  template:
    metadata:
      labels:
        app:  gpu
    spec:
      containers:
      - image:  nginx:alpine
        name:  gpu
        resources:
          requests:
            cpu:  100m
            memory:  200Mi
          limits:
            cpu:  100m
            memory:  200Mi
      imagePullSecrets:
      - name: default-secret
      affinity:
        nodeAffinity:
          preferredDuringSchedulingIgnoredDuringExecution:
          - weight: 80
            preference:
              matchExpressions:
              - key: DISK
                operator: In
                values:
                - SSD
          - weight: 20
            preference:
              matchExpressions:
              - key: gpu
                operator: In
                values:
                - "true"
After the deployment, there are five pods deployed on the node 192.168.0.212 (label: DISK=SSD and GPU=true), three pods deployed on the node 192.168.0.97 (label: DISK=SSD), and two pods deployed on the node 192.168.0.100 (label: DISK=SAS).
From the preceding output, you can find that no pods of the Deployment are scheduled to node 192.168.0.94 (label: DISK=SSD). This is because the node already has many pods on it and its resource usage is high. This also indicates that the preferredDuringSchedulingIgnoredDuringExecution rule defines a preference rather than a hard requirement.
$ kubectl create -f affinity2.yaml
deployment.apps/gpu created

$ kubectl get po -o wide
NAME                   READY   STATUS    RESTARTS   AGE     IP            NODE
gpu-585455d466-5bmcz   1/1     Running   0          2m29s   172.16.0.44   192.168.0.212
gpu-585455d466-cg2l6   1/1     Running   0          2m29s   172.16.0.63   192.168.0.97
gpu-585455d466-f2bt2   1/1     Running   0          2m29s   172.16.0.79   192.168.0.100
gpu-585455d466-hdb5n   1/1     Running   0          2m29s   172.16.0.42   192.168.0.212
gpu-585455d466-hkgvz   1/1     Running   0          2m29s   172.16.0.43   192.168.0.212
gpu-585455d466-mngvn   1/1     Running   0          2m29s   172.16.0.48   192.168.0.97
gpu-585455d466-s26qs   1/1     Running   0          2m29s   172.16.0.62   192.168.0.97
gpu-585455d466-sxtzm   1/1     Running   0          2m29s   172.16.0.45   192.168.0.212
gpu-585455d466-t56cm   1/1     Running   0          2m29s   172.16.0.64   192.168.0.100
gpu-585455d466-t5w5x   1/1     Running   0          2m29s   172.16.0.41   192.168.0.212
In the preceding example, the node scheduling priority is as follows. Nodes with both SSD and gpu=true labels have the highest priority. Nodes with the SSD label but no gpu=true label have the second priority (weight: 80). Nodes with the gpu=true label but no SSD label have the third priority. Nodes without any of these two labels have the lowest priority.
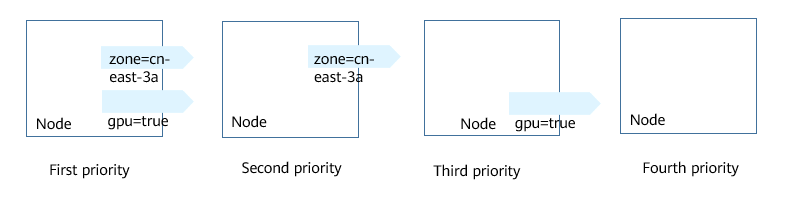
Figure 1 Scheduling priority
Workload Affinity (podAffinity)
Node affinity rules affect only the affinity between pods and nodes. Kubernetes also supports configuring inter-pod affinity rules. For example, the frontend and backend of an application can be deployed together on one node to reduce access latency. There are also two types of inter-pod affinity rules: requiredDuringSchedulingIgnoredDuringExecution and preferredDuringSchedulingIgnoredDuringExecution.
Note
For workload affinity, topologyKey cannot be left blank when requiredDuringSchedulingIgnoredDuringExecution and preferredDuringSchedulingIgnoredDuringExecution are used.
Assume that the backend of an application has been created and has the app=backend label.
$ kubectl get po -o wide
NAME                       READY   STATUS    RESTARTS   AGE     IP            NODE
backend-658f6cb858-dlrz8   1/1     Running   0          2m36s   172.16.0.67   192.168.0.100
You can configure the following pod affinity rule to deploy the frontend pods of the application to the same node as the backend pods.
apiVersion: apps/v1
kind: Deployment
metadata:
  name:   frontend
  labels:
    app:  frontend
spec:
  selector:
    matchLabels:
      app: frontend
  replicas: 3
  template:
    metadata:
      labels:
        app:  frontend
    spec:
      containers:
      - image:  nginx:alpine
        name:  frontend
        resources:
          requests:
            cpu:  100m
            memory:  200Mi
          limits:
            cpu:  100m
            memory:  200Mi
      imagePullSecrets:
      - name: default-secret
      affinity:
        podAffinity:
          requiredDuringSchedulingIgnoredDuringExecution:
          - topologyKey: kubernetes.io/hostname
            labelSelector:
              matchExpressions:
              - key: app
                operator: In
                values:
                - backend
Deploy the frontend and you can find that the frontend is deployed on the same node as the backend.
$ kubectl create -f affinity3.yaml
deployment.apps/frontend created

$ kubectl get po -o wide
NAME                        READY   STATUS    RESTARTS   AGE     IP            NODE
backend-658f6cb858-dlrz8    1/1     Running   0          5m38s   172.16.0.67   192.168.0.100
frontend-67ff9b7b97-dsqzn   1/1     Running   0          6s      172.16.0.70   192.168.0.100
frontend-67ff9b7b97-hxm5t   1/1     Running   0          6s      172.16.0.71   192.168.0.100
frontend-67ff9b7b97-z8pdb   1/1     Running   0          6s      172.16.0.72   192.168.0.100
The topologyKey field is used to divide topology domains to specify the selection range. If the label keys and values of nodes are the same, the nodes are considered to be in the same topology domain. Then, the contents defined in the following rules are selected. The effect of topologyKey is not fully demonstrated in the preceding example because all the nodes have the kubernetes.io/hostname label, that is, all the nodes are within the range.
To see how topologyKey works, assume that the backend of the application has two pods, which are running on different nodes.
$ kubectl get po -o wide
NAME                       READY   STATUS    RESTARTS   AGE     IP            NODE
backend-658f6cb858-5bpd6   1/1     Running   0          23m     172.16.0.40   192.168.0.97
backend-658f6cb858-dlrz8   1/1     Running   0          2m36s   172.16.0.67   192.168.0.100
Add the prefer=true label to nodes 192.168.0.97 and 192.168.0.94.
$ kubectl label node 192.168.0.97 prefer=true
node/192.168.0.97 labeled
$ kubectl label node 192.168.0.94 prefer=true
node/192.168.0.94 labeled

$ kubectl get node -L prefer
NAME            STATUS   ROLES    AGE   VERSION                            PREFER
192.168.0.100   Ready    <none>   44m   v1.15.6-r1-20.3.0.2.B001-15.30.2
192.168.0.212   Ready    <none>   91m   v1.15.6-r1-20.3.0.2.B001-15.30.2
192.168.0.94    Ready    <none>   91m   v1.15.6-r1-20.3.0.2.B001-15.30.2   true
192.168.0.97    Ready    <none>   91m   v1.15.6-r1-20.3.0.2.B001-15.30.2   true
If the topologyKey of podAffinity is set to prefer, the node topology domains are divided as shown in Figure 2.
affinity:
  podAffinity:
    requiredDuringSchedulingIgnoredDuringExecution:
    - topologyKey: prefer
      labelSelector:
        matchExpressions:
        - key: app
          operator: In
          values:
          - backend
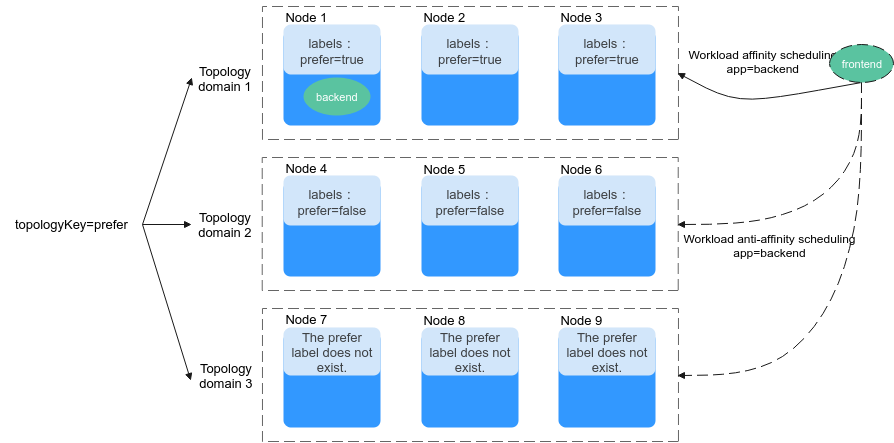
Figure 2 Topology domains
During scheduling, node topology domains are divided based on the prefer label. In this example, 192.168.0.97 and 192.168.0.94 are divided into the same topology domain. If a pod with the app=backend label runs in the topology domain, even if not all nodes in the topology domain run the pod with the app=backend label (in this example, only the 192.168.0.97 node has such a pod), frontend is also deployed in this topology domain (192.168.0.97 or 192.168.0.94).
$ kubectl create -f affinity3.yaml
deployment.apps/frontend created

$ kubectl get po -o wide
NAME                        READY   STATUS    RESTARTS   AGE     IP            NODE
backend-658f6cb858-5bpd6    1/1     Running   0          26m     172.16.0.40   192.168.0.97
backend-658f6cb858-dlrz8    1/1     Running   0          5m38s   172.16.0.67   192.168.0.100
frontend-67ff9b7b97-dsqzn   1/1     Running   0          6s      172.16.0.70   192.168.0.97
frontend-67ff9b7b97-hxm5t   1/1     Running   0          6s      172.16.0.71   192.168.0.97
frontend-67ff9b7b97-z8pdb   1/1     Running   0          6s      172.16.0.72   192.168.0.97
Workload Anti-Affinity (podAntiAffinity)
Unlike the scenarios in which pods are preferred to be scheduled onto the same node, sometimes, it could be the exact opposite. For example, if certain pods are deployed together, they will affect the performance.
Note
For workload anti-affinity, when requiredDuringSchedulingIgnoredDuringExecution is used, the default access controller LimitPodHardAntiAffinityTopology of Kubernetes requires that topologyKey can only be kubernetes.io/hostname. To use other custom topology logic, modify or disable the access controller.
The following is an example of defining an anti-affinity rule. This rule divides node topology domains by the kubernetes.io/hostname label. If a pod with the app=frontend label already exists on a node in the topology domain, pods with the same label cannot be scheduled to other nodes in the topology domain.
apiVersion: apps/v1
kind: Deployment
metadata:
  name:   frontend
  labels:
    app:  frontend
spec:
  selector:
    matchLabels:
      app: frontend
  replicas: 5
  template:
    metadata:
      labels:
        app:  frontend
    spec:
      containers:
      - image:  nginx:alpine
        name:  frontend
        resources:
          requests:
            cpu:  100m
            memory:  200Mi
          limits:
            cpu:  100m
            memory:  200Mi
      imagePullSecrets:
      - name: default-secret
      affinity:
        podAntiAffinity:
          requiredDuringSchedulingIgnoredDuringExecution:
          - topologyKey: kubernetes.io/hostname   # Topology domain of the node
            labelSelector:    # Pod label matching rule
              matchExpressions:
              - key: app
                operator: In
                values:
                - frontend
Create an anti-affinity rule and view the deployment result. In the example, node topology domains are divided by the kubernetes.io/hostname label. The label values of nodes with the kubernetes.io/hostname label are different, so there is only one node in a topology domain. If a frontend pod already exists in a topology domain, pods with the same label will not be scheduled to the topology domain. In this example, there are only four nodes. Therefore, there is one pod which is in the Pending state and cannot be scheduled.
$ kubectl create -f affinity4.yaml
deployment.apps/frontend created

$ kubectl get po -o wide
NAME                        READY   STATUS    RESTARTS   AGE   IP            NODE
frontend-6f686d8d87-8dlsc   1/1     Running   0          18s   172.16.0.76   192.168.0.100
frontend-6f686d8d87-d6l8p   0/1     Pending   0          18s   <none>        <none>
frontend-6f686d8d87-hgcq2   1/1     Running   0          18s   172.16.0.54   192.168.0.97
frontend-6f686d8d87-q7cfq   1/1     Running   0          18s   172.16.0.47   192.168.0.212
frontend-6f686d8d87-xl8hx   1/1     Running   0          18s   172.16.0.23   192.168.0.94
Operator Values
You can use the operator field to set the logical relationship of the usage rule. The value of operator can be:
In: The label of the affinity or anti-affinity object is in the label value list (values field).
NotIn: The label of the affinity or anti-affinity object is not in the label value list (values field).
Exists: The affinity or anti-affinity object has a specified label name.
DoesNotExist: The affinity or anti-affinity object does not have the specified label name.
Gt: (available only for node affinity) The label value of the scheduled node is greater than the list value (string comparison).
Lt: (available only for node affinity) The label value of the scheduled node is less than the list value (string comparison).