How Do I Change the Mode of the Docker Device Mapper?
Currently, private CCE clusters use Device Mapper as the Docker storage driver.
Device Mapper is developed based on the kernel framework and supports many advanced volume management technologies on Linux.
Docker Device Mapper storage driver leverages the thin provisioning and snapshot capabilities of this framework to manage images and containers.
For CCE clusters in v1.7.3-r6 or earlier versions, the Docker Device Mapper is set to the loop-lvm mode by default. By default, Docker generates data and metadata files in the /var/lib/docker/devicemapper/devicemapper directory. The two files are attached to loop devices and used as block devices. After multiple containers are attached to the files, the performance deteriorates dramatically.
The loop-lvm mode enables you to use Docker out of the box, without additional configuration. This mode is not recommended in the production environment. The Docker Device Mapper also supports the direct-lvm mode. This mode enables you to use raw partitions (no file systems). In the medium-load and high-density environments, this mode provides better performance.
To ensure system stability, you need to set the Docker Device Mapper to the direct-lvm mode.
CCE allows you to change the mode of the Device Mapper on VM nodes running on EulerOS.
Important
Changing the Docker Device Mapper mode on a node requires a data disk. Therefore, in the change process, the system automatically creates a 100 GB SATA disk and binds it to the node.
When the Docker Device Mapper mode on a node is changed to direct-lvm, the container and image data on the node will be deleted. Therefore, you must back up the container and image data of the node to a private image repository or Docker Hub repository before changing the mode.
Procedure
Check whether the Docker Device Mapper mode on a node is direct-lvm.
Method 1:
Log in to a node on which you want to view the Docker Device Mapper mode.
Query the configuration information under Storage-driver.
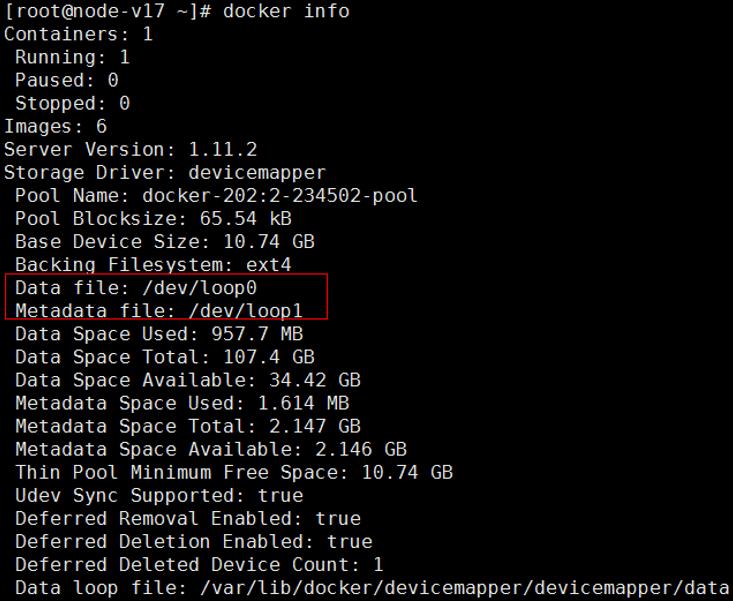
docker info
If the values of the Data file and Metadata file parameters under Storage-driver are /dev/loopx, the Docker Device Mapper mode of the current node is loop-lvm. Change the mode by following 2.
Example:
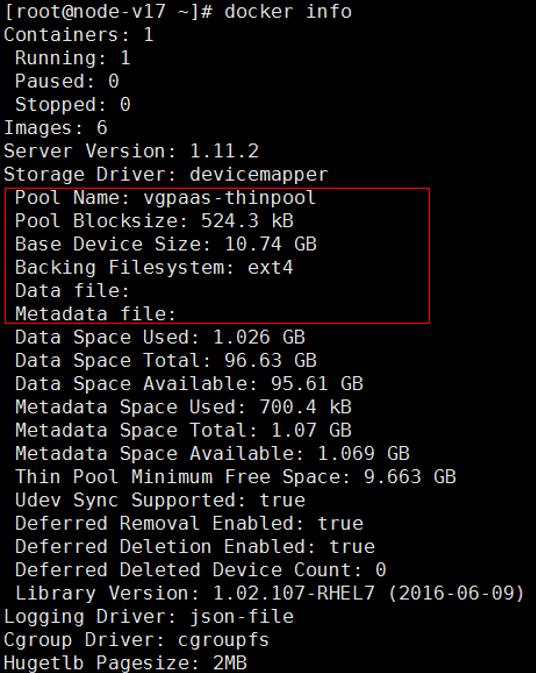
If the values of the Data file and Metadata file parameters under Storage-driver are left blank and the value of Pool Name is vgpaas-thinpool, the Docker Device Mapper mode of the current node is direct-lvm. You do not need to change the mode.
Example:
Method 2:
Log in to a node on which you want to view the Docker Device Mapper mode.
Check whether the following information is displayed:
cat /etc/docker/daemon.json
"dm.thinpooldev=/dev/mapper/vgpaas-thinpool"If the command output contains the preceding information, the Docker Device Mapper mode of the current node is direct-lvm. You do not need to change the mode.
If the command output does not contain the preceding information or a message indicating that a file such as daemon.json is unavailable is displayed, the Docker Device Mapper mode of the current node is not direct-lvm. Change the mode by following 2.
(Optional) If no elastic IP address is bound to the node for which the Docker Device Mapper mode needs to be changed, bind an elastic IP address.
Log in to the node with an elastic IP address as the root user.
Create a configuration file.
touch config.yaml
Copy the following content to the configuration file:
user:
  domainName:
  username:
  password:
  projectName:
apiGatewayIp:
iamHostname:
ecsHostname:
evsHostname:
swrAddr:
defaultPassword:
defaultPrivateKey:
hosts:
  - host: <node_ip_01>
    user: root
    password:
    privateKey:
    serverId:
  - host: <node_ip_02>
    user: root
    password:
    privateKey:
    serverId:
Table 1 Parameter description¶ Parameter
Description
domainName
Tenant name
username
User name
password
User password, which is enclosed in quotation marks ('' '')
projectName
Name of the project to which the to-be-configured node belongs
apiGatewayIp
IP address of an API gateway
iamHostname
Endpoint of the IAM service
ecsHostname
Endpoint of the ECS service
evsHostname
Endpoint of the EVS service
swrAddr
Address of a software repository
defaultPassword
(Optional) Default login password of a node. The value must be enclosed in quotation marks ('' '').
defaultPrivateKey
(Optional) Absolute path to the default key file for logging in to a node. The value must be enclosed in quotation marks ('' '').
hosts
Host array structure [1]. You can set multiple nodes for which you want to change the Device Mapper mode. The following parameters must be included: user, password/privateKey, and serverId. For details about the host array structure, see Table 2.
Table 2 Parameter description about the host array structure¶ Parameter
Description
host
IP address of the node for which you want to change the Device Mapper mode. This node must be in the same subnet as the current logged-in node.
user
User name. Set this parameter to root.
password
Password for the root user on the node for which you want to change the Device Mapper mode. The value must be enclosed in quotation marks ('' '').
Note
Set either password or privateKey.
privateKey
Absolute path to the key file of the root user on the node for which you want to change the Device Mapper mode. The value must be enclosed in quotation marks ('' '').
Note
Set either password or privateKey.
serverId
ID of the ECS corresponding to the node for which you want to change the Device Mapper mode
Modify the configuration of the nodes in the cluster.
It takes about 3 to 5 minutes to configure a node.
curl -k https://<swr-address>:20202/swr/v2/domains/op_svc_servicestage/namespaces/op_svc_servicestage/repositories/default/packages/cluster-versions/versions/base/file_paths/cceadm -1 -O;chmod u+x cceadm; ./cceadm batch-config-docker --conf=./config.yaml
Replace <swr-address> with the address of a software repository, which is the same as the value of swrAddr in Table 1.