Creating a LoadBalancer Service
Scenario
LoadBalancer Services can access workloads from the public network through a load balancer, which is more reliable than EIP-based access. The LoadBalancer access address is in the format of IP address of public network load balancer:Access port, for example, 10.117.117.117:80.
In this access mode, requests are transmitted through an ELB load balancer to a node and then forwarded to the destination pod through the Service.

Figure 1 LoadBalancer
When CCE Turbo clusters and dedicated load balancers are used, passthrough networking is supported to reduce service latency and ensure zero performance loss.
External access requests are directly forwarded from a load balancer to pods. Internal access requests can be forwarded to a pod through a Service.
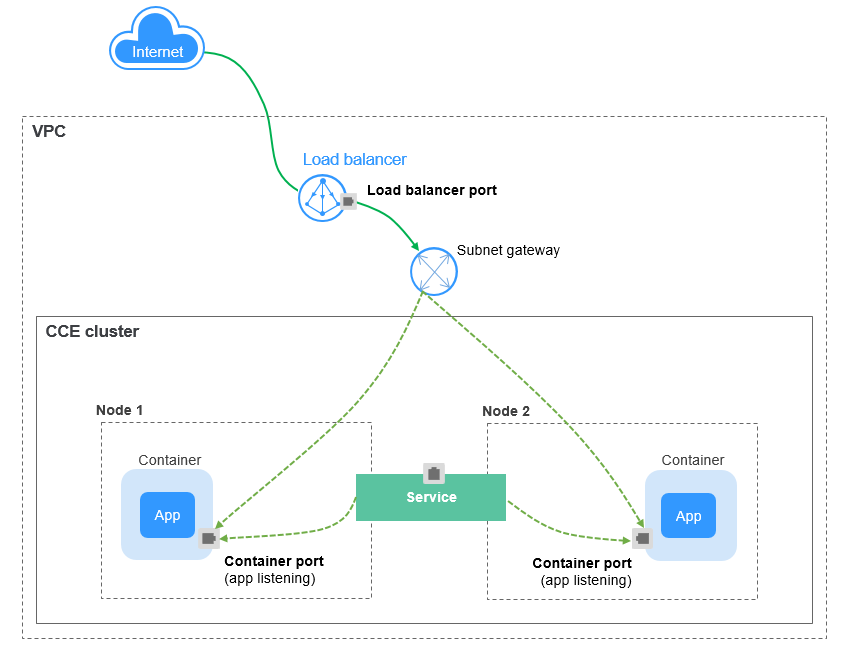
Figure 2 Passthrough networking
Notes and Constraints
LoadBalancer Services allow workloads to be accessed from public networks through ELB. This access mode has the following restrictions:
Automatically created load balancers should not be used by other resources. Otherwise, these load balancers cannot be completely deleted.
Do not change the listener name for the load balancer in clusters of v1.15 and earlier. Otherwise, the load balancer cannot be accessed.
After a Service is created, if the affinity setting is switched from the cluster level to the node level, the connection tracing table will not be cleared. Do not modify the Service affinity setting after the Service is created. To modify it, create a Service again.
If service affinity is set to the node level (that is, externalTrafficPolicy is set to Local), the cluster may fail to access the Service by using the ELB address. For details, see Why a Service Fail to Be Accessed from Within the Cluster.
In a CCE Turbo cluster that utilizes Cloud Native Network 2.0, node-level affinity is supported only when the Service backend is connected to a hostNetwork pod.
Dedicated ELB load balancers can be used only in clusters of v1.17 and later.
Dedicated load balancers must support private networks (with private IP addresses). If the Service needs to support HTTP, the dedicated load balancers must be of the application (HTTP/HTTPS) type.
When the cluster service forwarding (proxy) mode is IPVS, the node IP cannot be configured as the external IP of the Service. Otherwise, the node is unavailable.
If you have an IPVS-backed cluster and use the same ELB load balancer for both the ingress and Service in the same cluster or for the Service ports in different clusters, you will not be able to access the ingress from the nodes or containers in the cluster, or the Service ports in other clusters. This is because kube-proxy mounts the LoadBalancer Service address to the ipvs-0 bridge, which intercepts the load balancer traffic. Use separate load balancers for these ingresses and Services.
Using the Console
Log in to the CCE console and click the cluster name to access the cluster console.
In the navigation pane, choose Services & Ingresses. In the upper right corner, click Create Service.
Configure parameters.
Service Name: Specify a Service name, which can be the same as the workload name.
Service Type: Select LoadBalancer.
Namespace: namespace that the workload belongs to.
Service Affinity: For details, see externalTrafficPolicy (Service Affinity).
Cluster level: The IP addresses and access ports of all nodes in a cluster can access the workload associated with the Service. Accessing the Service will result in a decrease in performance due to route redirection, and the source IP address of the client cannot be obtained.
Node level: Only the IP address and access port of the node where the workload is located can access the workload associated with the Service. Accessing the Service will not result in a decrease in performance due to route redirection, and the source IP address of the client can be obtained.
Selector: Add a label and click Confirm. The Service will use this label to select pods. You can also click Reference Workload Label to use the label of an existing workload. In the dialog box that is displayed, select a workload and click OK.
Protocol Version: This function is disabled by default. After this function is enabled, the cluster IP address of the Service can be set to an IPv6 address. This function is available only in clusters of v1.15 or later with IPv6 enabled (set during cluster creation).
Load Balancer: Select a load balancer type and creation mode.
A load balancer can be dedicated or shared. A dedicated load balancer supports Network (TCP/UDP), Application (HTTP/HTTPS), or Network (TCP/UDP) & Application (HTTP/HTTPS).
You can select Use existing or Auto create to obtain a load balancer. For details about the configuration of different creation modes, see Table 1.
Table 1 Load balancer configurations¶ How to Create
Configuration
Use existing
Only the load balancers in the same VPC as the cluster can be selected. If no load balancer is available, click Create Load Balancer to create one on the ELB console.
Auto create
Instance Name: Enter a load balancer name.
AZ: available only to dedicated load balancers. You can create load balancers in multiple AZs to improve service availability. You can deploy a load balancer in multiple AZs for high availability.
Frontend Subnet: available only to dedicated load balancers. It is used to allocate IP addresses for load balancers to provide services externally.
Backend Subnet: available only to dedicated load balancers. It is used to allocate IP addresses for load balancers to access the backend service.
Network Specifications, Application-oriented Specifications, or Specifications (available only to dedicated load balancers)
Elastic: applies to fluctuating traffic, billed based on total traffic. Clusters of v1.21.10-r10, v1.23.8-r10, v1.25.3-r10, and later versions support elastic specifications.
Fixed: applies to stable traffic, billed based on specifications.
EIP: If you select Auto create, you can configure the size of the public network bandwidth.
Resource Tag: You can add resource tags to classify resources. You can create predefined tags on the TMS console. These tags are available to all resources that support tags. You can use these tags to improve the tag creation and resource migration efficiency.
Set ELB: You can click Edit and configure the load balancing algorithm and sticky session.
Algorithm: Three algorithms are available: weighted round robin, weighted least connections algorithm, or source IP hash.
Note
Weighted round robin: Requests are forwarded to different servers based on their weights, which indicate server processing performance. Backend servers with higher weights receive proportionately more requests, whereas equal-weighted servers receive the same number of requests. This algorithm is often used for short connections, such as HTTP services.
Weighted least connections: In addition to the weight assigned to each server, the number of connections processed by each backend server is considered. Requests are forwarded to the server with the lowest connections-to-weight ratio. Building on least connections, the weighted least connections algorithm assigns a weight to each server based on their processing capability. This algorithm is often used for persistent connections, such as database connections.
Source IP hash: The source IP address of each request is calculated using the hash algorithm to obtain a unique hash key, and all backend servers are numbered. The generated key allocates the client to a particular server. This enables requests from different clients to be distributed in load balancing mode and ensures that requests from the same client are forwarded to the same server. This algorithm applies to TCP connections without cookies.
Sticky Session: This function is disabled by default.
If the listener's frontend protocol is TCP or UDP, sticky sessions can use source IP addresses. This means that access requests from the same IP address will be directed to the same backend server or pod.
Note
When the distribution policy uses the source IP hash, sticky session cannot be set.
Health Check: Configure health check for the load balancer.
Global: applies only to ports using the same protocol. If you need to configure multiple ports using different protocols, select Custom.
Custom health check: applies to ports using different protocols. For details about the YAML configuration for custom health check, see Configuring Health Check on Multiple LoadBalancer Service Ports.
Table 2 Health check parameters¶ Parameter
Description
Protocol
When the protocol of Port is set to TCP, the TCP and HTTP protocols are supported. When the protocol of Port is set to UDP, the UDP protocol is supported.
Check Path (supported only by HTTP for health check): specifies the health check URL. The check path must start with a slash (/) and contain 1 to 80 characters.
Port
By default, the service port (NodePort or container port of the Service) is used for health check. You can also specify another port for health check. After the port is specified, a service port named cce-healthz will be added for the Service.
Node Port: If a shared or dedicated load balancer is used without an associated ENI, the node port will be used as the health check port. If the port is not specified, a random port will be used. The value ranges from 30000 to 32767.
Container Port: When a dedicated load balancer is associated with an ENI instance, the container port is used for health check. The value ranges from 1 to 65535.
Check Period (s)
Specifies the maximum interval between health checks. The value ranges from 1 to 50.
Timeout (s)
Specifies the maximum timeout for each health check. The value ranges from 1 to 50.
Max. Retries
Specifies the maximum number of health check retries. The value ranges from 1 to 10.
Ports
Protocol: protocol used by the Service.
Container Port: listener port of the workload. For example, Nginx uses port 80 by default.
Service Port: port used by the Service. The port number ranges from 1 to 65535.
Frontend Protocol: the frontend protocol of the load balancer listener for establishing a traffic distribution connection with the client. When a dedicated load balancer is selected, HTTP/HTTPS can be configured only when Application (HTTP/HTTPS) is selected.
Health Check: If Health Check is set to Custom health check, you can configure health check for ports using different protocols. For details, see Table 2.
Note
When a LoadBalancer Service is created, a random node port number (NodePort) is automatically generated.
Listener
SSL Authentication: Select this option if HTTPS/TLS is enabled on the listener port. This parameter is available only in clusters of v1.23.14-r0, v1.25.9-r0, v1.27.6-r0, v1.28.4-r0, or later versions.
One-way authentication: Only the backend server is authenticated. If you also need to authenticate the identity of the client, select mutual authentication.
Mutual authentication: If you want the clients and the load balancer to authenticate each other, select this option. Only authenticated clients will be allowed to access the load balancer.
CA Certificate: If SSL Authentication is set to Mutual authentication, add a CA certificate to authenticate the client. A CA certificate is issued by a certificate authority (CA) and used to verify the certificate issuer. If HTTPS mutual authentication is required, HTTPS connections can be established only when the client provides a certificate issued by a specific CA.
Server Certificate: If HTTPS/TLS is enabled on the listener port, you must select a server certificate.
SNI: If HTTPS/TLS is enabled on the listener port, you must determine whether to add an SNI certificate. Before adding an SNI certificate, ensure the certificate contains a domain name.
If an SNI certificate cannot be found based on the domain name requested by the client, the server certificate will be returned by default.
Security Policy: If HTTPS/TLS is enabled on the listener port, you can select a security policy. This parameter is available only in clusters of v1.23.14-r0, v1.25.9-r0, v1.27.6-r0, v1.28.4-r0, or later versions.
Backend Protocol: If HTTPS is enabled on the listener port, HTTP or HTTPS can be used to access the backend server. The default value is HTTP. If TLS is enabled on the listener port, TCP or TLS can be used to access the backend server. The default value is TCP. This parameter is available only in clusters of v1.23.14-r0, v1.25.9-r0, v1.27.6-r0, v1.28.4-r0, or later versions.
Access Control
Inherit ELB Configurations: CCE does not modify the existing access control configurations on the ELB console.
Allow all IP addresses: No access control is configured.
Trustlist: Only the selected IP address group can access the load balancer.
Blocklist: The selected IP address group cannot access the load balancer.
Note
For clusters of v1.25.16-r10, v1.27.16-r10, v1.28.15-r0, v1.29.10-r0, v1.30.6-r0, v1.31.1-r0, or later, when using a dedicated load balancer, you can select a maximum of five IP address groups at a time for access control.
Advanced Options
Configuration
Description
Restrictions
Idle Timeout (s)
Timeout for an idle client connection. If there are no requests reaching the load balancer during the timeout duration, the load balancer will disconnect the connection from the client and establish a new connection when there is a new request.
This configuration is not supported if the port of a shared load balancer uses UDP.
Request Timeout (s)
Timeout for waiting for a request from a client. There are two cases:
If the client fails to send a request header to the load balancer during the timeout duration, the request will be interrupted.
If the interval between two consecutive request bodies reaching the load balancer is greater than the timeout duration, the connection will be disconnected.
This parameter is available only after HTTP/HTTPS is enabled on ports.
Response Timeout (s)
Timeout for waiting for a response from a backend server. After a request is forwarded to the backend server, if the backend server does not respond during the timeout duration, the load balancer will stop waiting and return HTTP 504 Gateway Timeout.
This parameter is available only after HTTP/HTTPS is enabled on ports.
HTTP2
Whether to use HTTP/2 for a client to communicate with a load balancer. Request forwarding using HTTP/2 improves the access performance between your application and the load balancer. However, the load balancer still uses HTTP/1.x to forward requests to the backend server.
This parameter is available only after HTTPS is enabled on ports.
Annotation: The LoadBalancer Service has some advanced CCE functions, which are implemented by annotations. For details, see Configuring LoadBalancer Services Using Annotations.
Click OK.
Using kubectl to Create a Service (Using an Existing Load Balancer)
You can configure LoadBalancer Service access using kubectl when creating a workload. If you already have a load balancer in the same VPC and want to use it as the application access entry when creating a Service in the cluster, follow the following steps to associate the load balancer with the Service:
Use kubectl to access the cluster. For details, see Accessing a Cluster Using kubectl.
Create and edit the nginx-deployment.yaml file to configure the sample workload. For details, see Creating a Deployment. nginx-deployment.yaml is an example file name. You can rename it as needed.
vi nginx-deployment.yaml
File content:
apiVersion: apps/v1
kind: Deployment
metadata:
  name: nginx
spec:
  replicas: 1
  selector:
    matchLabels:
      app: nginx
  template:
    metadata:
      labels:
        app: nginx
    spec:
      containers:
      - image: nginx:latest
        name: nginx
      imagePullSecrets:
      - name: default-secret
Create and edit the nginx-elb-svc.yaml file to configure Service parameters. nginx-elb-svc.yaml is an example file name. You can rename it as needed.
vi nginx-elb-svc.yaml
File content:
apiVersion: v1
kind: Service
metadata:
  name: nginx
  annotations:
    kubernetes.io/elb.id: <your_elb_id>                         # Load balancer ID. Replace it with the actual value.
    kubernetes.io/elb.class: union                   # Load balancer type
    kubernetes.io/elb.lb-algorithm: ROUND_ROBIN                   # Load balancer algorithm
    kubernetes.io/elb.session-affinity-mode: SOURCE_IP          # The sticky session type is source IP address.
    kubernetes.io/elb.session-affinity-option: '{"persistence_timeout": "30"}'     # Stickiness duration, which is measured in minutes
    kubernetes.io/elb.health-check-flag: 'on'                   # Enable ELB health check.
    kubernetes.io/elb.health-check-option: '{
      "protocol":"TCP",
      "delay":"5",
      "timeout":"10",
      "max_retries":"3"
    }'
spec:
  selector:
     app: nginx
  ports:
  - name: service0
    port: 80     # Port for accessing the Service, which is also the listener port on the load balancer.
    protocol: TCP
    targetPort: 80  # Port used by a Service to access the target container. This port is closely related to the applications running in a container.
    nodePort: 31128  # Port number of the node. If this parameter is not specified, a random port number ranging from 30000 to 32767 is generated.
  type: LoadBalancer
Note
To enable sticky sessions, ensure anti-affinity is configured for the workload pods so that the pods are deployed onto different nodes. For details, see Configuring Workload Affinity or Anti-affinity Scheduling (podAffinity or podAntiAffinity).
The preceding example uses annotations to implement some advanced functions of load balancing, such as sticky session and health check. For details, see Table 3.
For more annotations and examples related to advanced functions, see Configuring LoadBalancer Services Using Annotations.
Table 3 annotations parameters¶ Parameter
Mandatory
Type
Description
kubernetes.io/elb.id
Yes
String
ID of a load balancer.
Mandatory when an existing load balancer is associated.
How to obtain:
On the management console, click Service List, and choose Networking > Elastic Load Balance. Click the name of the target load balancer. On the Summary tab page, find and copy the ID.
Note
The system preferentially connects to the load balancer based on the kubernetes.io/elb.id field. If this field is not specified, the spec.loadBalancerIP field is used (optional and available only in 1.23 and earlier versions).
Do not use the spec.loadBalancerIP field to connect to the load balancer. This field will be discarded by Kubernetes. For details, see Deprecation.
kubernetes.io/elb.class
Yes
String
Select a proper load balancer type.
Options:
union: shared load balancer
performance: dedicated load balancer, which can be used only in clusters of v1.17 and later.
kubernetes.io/elb.lb-algorithm
No
String
Specifies the load balancing algorithm of the backend server group. The default value is ROUND_ROBIN.
Options:
ROUND_ROBIN: weighted round robin algorithm
LEAST_CONNECTIONS: weighted least connections algorithm
SOURCE_IP: source IP hash algorithm
Note
If this parameter is set to SOURCE_IP, the weight setting (weight field) of backend servers bound to the backend server group is invalid, and sticky session cannot be enabled.
kubernetes.io/elb.session-affinity-mode
No
String
Source IP address-based sticky session means that access requests from the same IP address are forwarded to the same backend server.
To disable sticky sessions, leave this parameter unconfigured.
To enable sticky sessions, ensure the frontend protocol is TCP or UDP and set the sticky session type to SOURCE_IP.
Note
When kubernetes.io/elb.lb-algorithm is set to SOURCE_IP (source IP hash), sticky session cannot be enabled.
kubernetes.io/elb.session-affinity-option
No
Table 4 object
Sticky session timeout.
kubernetes.io/elb.health-check-flag
No
String
Whether to enable the ELB health check.
Enabling health check: Leave this parameter blank or set it to on.
Disabling health check: Set this parameter to off.
If this parameter is enabled, the kubernetes.io/elb.health-check-option field must also be specified.
kubernetes.io/elb.health-check-option
No
Table 5 object
ELB health check configuration items.
Table 4 elb.session-affinity-option data structure¶ Parameter
Mandatory
Type
Description
persistence_timeout
Yes
String
Sticky session timeout, in minutes. This parameter is valid only when elb.session-affinity-mode is set to SOURCE_IP.
Value range: 1 to 60. Default value: 60
Table 5 elb.health-check-option data structure¶ Parameter
Mandatory
Type
Description
delay
No
String
Health check interval (s)
Value range: 1 to 50. Default value: 5
timeout
No
String
Health check timeout, in seconds.
Value range: 1 to 50. Default value: 10
max_retries
No
String
Maximum number of health check retries.
Value range: 1 to 10. Default value: 3
protocol
No
String
Health check protocol.
Options: TCP, UDP, or HTTP
path
No
String
Health check URL. This parameter needs to be configured when the protocol is HTTP.
Default value: /
Value range: 1-80 characters
Create a workload.
kubectl create -f nginx-deployment.yaml
If information similar to the following is displayed, the workload has been created:
deployment/nginx created
Check the created workload.
kubectl get pod
If information similar to the following is displayed, the workload is running:
NAME                     READY     STATUS             RESTARTS   AGE
nginx-2601814895-znhbr   1/1       Running            0          15s
Create a Service.
kubectl create -f nginx-elb-svc.yaml
If information similar to the following is displayed, the Service has been created.
service/nginx created
View the created Service.
kubectl get svc
If information similar to the following is displayed, the workload's access mode has been configured:
NAME         TYPE           CLUSTER-IP       EXTERNAL-IP   PORT(S)        AGE
kubernetes   ClusterIP      10.247.0.1       <none>        443/TCP        3d
nginx        LoadBalancer   10.247.130.196   10.78.42.242   80:31540/TCP   51s
Enter the URL in the address box of the browser, for example, 10.78.42.242:80. 10.78.42.242 indicates the IP address of the load balancer, and 80 indicates the access port displayed on the CCE console.
The Nginx is accessible.
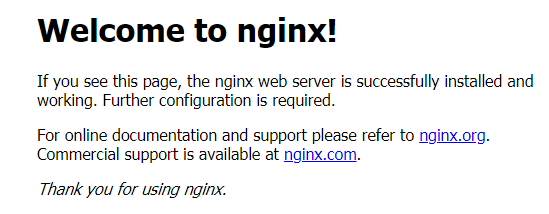
Figure 3 Accessing Nginx through the LoadBalancer Service
Using kubectl to Create a Service (Automatically Creating a Load Balancer)
You can configure LoadBalancer Service access using kubectl when creating a workload. If no load balancer is available when you create a Service, perform the following operations to automatically create a load balancer and associate it with the Service:
Use kubectl to access the cluster. For details, see Accessing a Cluster Using kubectl.
Create and edit the nginx-deployment.yaml file to configure the sample workload. For details, see Creating a Deployment. nginx-deployment.yaml is an example file name. You can rename it as needed.
vi nginx-deployment.yaml
File content:
apiVersion: apps/v1
kind: Deployment
metadata:
  name: nginx
spec:
  replicas: 1
  selector:
    matchLabels:
      app: nginx
  template:
    metadata:
      labels:
        app: nginx
    spec:
      containers:
      - image: nginx:latest
        name: nginx
      imagePullSecrets:
      - name: default-secret
Create and edit the nginx-elb-svc.yaml file to configure Service parameters. nginx-elb-svc.yaml is an example file name. You can rename it as needed.
vi nginx-elb-svc.yaml
Note
To enable sticky sessions, ensure anti-affinity is configured for the workload pods so that the pods are deployed onto different nodes. For details, see Configuring Workload Affinity or Anti-affinity Scheduling (podAffinity or podAntiAffinity).
Example of a Service using a public network shared load balancer:
apiVersion: v1
kind: Service
metadata:
  annotations:
    kubernetes.io/elb.class: union
    kubernetes.io/elb.autocreate: '{
      "type": "public",
      "bandwidth_name": "cce-bandwidth-1551163379627",
      "bandwidth_chargemode": "traffic",
      "bandwidth_size": 5,
      "bandwidth_sharetype": "PER",
      "vip_subnet_cidr_id": "*****",
      "vip_address": "**.**.**.**",
      "eip_type": "5_bgp"
    }'
    kubernetes.io/elb.lb-algorithm: ROUND_ROBIN                   # Load balancer algorithm
    kubernetes.io/elb.session-affinity-mode: SOURCE_IP          # The sticky session type is source IP address.
    kubernetes.io/elb.session-affinity-option: '{"persistence_timeout": "30"}'     # Stickiness duration, which is measured in minutes
    kubernetes.io/elb.health-check-flag: 'on'                   # Enable ELB health check.
    kubernetes.io/elb.health-check-option: '{
      "protocol":"TCP",
      "delay":"5",
      "timeout":"10",
      "max_retries":"3"
    }'
    kubernetes.io/elb.tags: key1=value1,key2=value2           # ELB resource tags
  labels:
    app: nginx
  name: nginx
spec:
  ports:
  - name: service0
    port: 80
    protocol: TCP
    targetPort: 80
  selector:
    app: nginx
  type: LoadBalancer
Example Service using a public network dedicated load balancer (only for clusters of v1.17 and later):
apiVersion: v1
kind: Service
metadata:
  name: nginx
  labels:
    app: nginx
  namespace: default
  annotations:
    kubernetes.io/elb.class: performance
    kubernetes.io/elb.autocreate: '{
      "type": "public",
      "bandwidth_name": "cce-bandwidth-1626694478577",
      "bandwidth_chargemode": "traffic",
      "bandwidth_size": 5,
      "bandwidth_sharetype": "PER",
      "eip_type": "5_bgp",
      "vip_subnet_cidr_id": "*****",
      "vip_address": "**.**.**.**",
      "elb_virsubnet_ids": ["*****"],
      "ipv6_vip_virsubnet_id": "*****",
      "available_zone": [
         ""
      ],
      "l4_flavor_name": "L4_flavor.elb.s1.small"
    }'
    kubernetes.io/elb.lb-algorithm: ROUND_ROBIN                   # Load balancer algorithm
    kubernetes.io/elb.session-affinity-mode: SOURCE_IP          # The sticky session type is source IP address.
    kubernetes.io/elb.session-affinity-option: '{"persistence_timeout": "30"}'     # Stickiness duration, which is measured in minutes
    kubernetes.io/elb.health-check-flag: 'on'                   # Enable ELB health check.
    kubernetes.io/elb.health-check-option: '{
      "protocol":"TCP",
      "delay":"5",
      "timeout":"10",
      "max_retries":"3"
    }'
    kubernetes.io/elb.tags: key1=value1,key2=value2           # ELB resource tags
spec:
  selector:
    app: nginx
  ports:
  - name: cce-service-0
    targetPort: 80
    nodePort: 0
    port: 80
    protocol: TCP
  type: LoadBalancer
The preceding example uses annotations to implement some advanced functions of load balancing, such as sticky session and health check. For details, see Table 6.
For more annotations and examples related to advanced functions, see Configuring LoadBalancer Services Using Annotations.
Table 6 annotations parameters¶ Parameter
Mandatory
Type
Description
kubernetes.io/elb.class
Yes
String
Select a proper load balancer type.
Options:
union: shared load balancer
performance: dedicated load balancer, which can be used only in clusters of v1.17 and later.
The default value is union.
kubernetes.io/elb.autocreate
Yes
elb.autocreate object
Whether to automatically create a load balancer associated with the Service.
Example
Automatically created dedicated load balancer with an EIP bound:
'{"type":"public","bandwidth_name":"cce-bandwidth-1741230802502","bandwidth_chargemode":"traffic","bandwidth_size":5,"bandwidth_sharetype":"PER","eip_type":"5_bgp","available_zone":["
*****"],"elb_virsubnet_ids":["*****"],"l7_flavor_name":"","l4_flavor_name":"L4_flavor.elb.pro.max","vip_subnet_cidr_id":"*****"}'Automatically created dedicated load balancer with no EIP bound:
'{"type":"inner","available_zone":["
*****"],"elb_virsubnet_ids":["*****"],"l7_flavor_name":"","l4_flavor_name":"L4_flavor.elb.pro.max","vip_subnet_cidr_id":"*****"}'Automatically created shared load balancer with an EIP bound:
'{"type":"public","bandwidth_name":"cce-bandwidth-1551163379627","bandwidth_chargemode":"traffic,"bandwidth_size":5,"bandwidth_sharetype":"PER","eip_type":"5_bgp","name":"james"}'
Automatically created shared load balancer with no EIP bound:
{"type":"inner","name":"A-location-d-test"}
kubernetes.io/elb.subnet-id
None
String
ID of the subnet where the cluster is located. The value can contain 1 to 100 characters.
Mandatory when a cluster of v1.11.7-r0 or earlier is to be automatically created.
Optional for clusters of a version later than v1.11.7-r0.
kubernetes.io/elb.lb-algorithm
No
String
Specifies the load balancing algorithm of the backend server group. The default value is ROUND_ROBIN.
Options:
ROUND_ROBIN: weighted round robin algorithm
LEAST_CONNECTIONS: weighted least connections algorithm
SOURCE_IP: source IP hash algorithm
Note
If this parameter is set to SOURCE_IP, the weight setting (weight field) of backend servers bound to the backend server group is invalid, and sticky session cannot be enabled.
kubernetes.io/elb.session-affinity-mode
No
String
Source IP address-based sticky session means that access requests from the same IP address are forwarded to the same backend server.
To disable sticky sessions, leave this parameter unconfigured.
To enable sticky session, add this parameter and set it to SOURCE_IP, indicating that the sticky session is based on the source IP address.
Note
When kubernetes.io/elb.lb-algorithm is set to SOURCE_IP (source IP hash), sticky session cannot be enabled.
kubernetes.io/elb.session-affinity-option
No
Table 4 object
Sticky session timeout.
kubernetes.io/elb.health-check-flag
No
String
Whether to enable the ELB health check.
Enabling health check: Leave this parameter blank or set it to on.
Disabling health check: Set this parameter to off.
If this parameter is enabled, the kubernetes.io/elb.health-check-option field must also be specified.
kubernetes.io/elb.health-check-option
No
Table 5 object
ELB health check configuration items.
Table 7 elb.autocreate data structure¶ Parameter
Mandatory
Type
Description
name
No
String
Name of the automatically created load balancer.
The value can contain 1 to 64 characters. Only letters, digits, underscores (_), hyphens (-), and periods (.) are allowed.
Default: cce-lb+service.UID
type
No
String
Network type of the load balancer.
public: public network load balancer
inner: private network load balancer
Default: inner
bandwidth_name
Yes for public network load balancers
String
Bandwidth name. The default value is cce-bandwidth-
******.The value can contain 1 to 64 characters. Only letters, digits, underscores (_), hyphens (-), and periods (.) are allowed.
bandwidth_chargemode
No
String
Bandwidth mode.
traffic: billed by traffic
Default: traffic
bandwidth_size
Yes for public network load balancers
Integer
Bandwidth size. The value ranges from 1 Mbit/s to 2000 Mbit/s by default. Configure this parameter based on the bandwidth range allowed in your region.
The minimum increment for bandwidth adjustment varies depending on the bandwidth range.
The minimum increment is 1 Mbit/s if the allowed bandwidth does not exceed 300 Mbit/s.
The minimum increment is 50 Mbit/s if the allowed bandwidth ranges from 300 Mbit/s to 1000 Mbit/s.
The minimum increment is 500 Mbit/s if the allowed bandwidth exceeds 1000 Mbit/s.
bandwidth_sharetype
Yes for public network load balancers
String
Bandwidth sharing mode.
PER: dedicated bandwidth
eip_type
Yes for public network load balancers
String
EIP type.
5_bgp: dynamic BGP
The specific type varies with regions. For details, see the EIP console.
vip_subnet_cidr_id
No
String
The ID of the IPv4 subnet where the load balancer resides. This subnet is used to allocate IP addresses for the load balancer to provide external services. The IPv4 subnet must belong to the cluster's VPC.
If this parameter is not specified, the load balancer and the cluster will be in the same subnet by default.
This field can be specified only for clusters of v1.21 or later.
How to Obtain
Log in to the VPC console. In the navigation pane, choose Subnets. Filter the target subnet by the cluster's VPC name, click the subnet name, and copy the IPv4 Subnet ID on the Summary tab page.
ipv6_vip_virsubnet_id
No
String
The ID of the IPv6 subnet where the load balancer is deployed. IPv6 must be enabled for the subnet.
This parameter is available only for dedicated load balancers.
How to Obtain
Log in to the VPC console. In the navigation pane, choose Subnets. Filter the target subnet by the cluster's VPC name, click the subnet name, and copy the Network ID on the Summary tab page.
elb_virsubnet_ids
No
Array of strings
The network ID of the subnet where the load balancer is located. This subnet is used to allocate IP addresses for accessing the backend server. If this parameter is not specified, the subnet specified by vip_subnet_cidr_id will be used by default. Load balancers occupy varying numbers of subnet IP addresses based on their specifications. Do not use the subnet CIDR blocks of other resources (such as clusters or nodes) as the load balancer's CIDR block.
This parameter is available only for dedicated load balancers.
Example:
"elb_virsubnet_ids": [
   "14567f27-8ae4-42b8-ae47-9f847a4690dd"
 ]
How to Obtain
Log in to the VPC console. In the navigation pane, choose Subnets. Filter the target subnet by the cluster's VPC name, click the subnet name, and copy the Network ID on the Summary tab page.
vip_address
No
String
Private IP address of the load balancer. Only IPv4 addresses are supported.
The IP address must be in the ELB CIDR block. If this parameter is not specified, an IP address will be automatically assigned from the ELB CIDR block.
This parameter is available only in clusters of v1.23.11-r0, v1.25.6-r0, v1.27.3-r0, or later versions.
available_zone
Yes
Array of strings
AZ where the load balancer is located.
You can obtain all supported AZs by getting the AZ list.
This parameter is available only for dedicated load balancers.
l4_flavor_name
No
String
Flavor name of the layer-4 load balancer. This parameter is mandatory when TCP or UDP is used.
You can obtain all supported types by getting the flavor list.
This parameter is available only for dedicated load balancers.
l7_flavor_name
No
String
Flavor name of the layer-7 load balancer. This parameter is mandatory when HTTP is used.
You can obtain all supported types by getting the flavor list.
This parameter is available only for dedicated load balancers. Its value must match that of l4_flavor_name, meaning both must be either elastic specifications or fixed specifications.
Create a workload.
kubectl create -f nginx-deployment.yaml
If information similar to the following is displayed, the workload has been created:
deployment/nginx created
Check the created workload.
kubectl get pod
If information similar to the following is displayed, the workload is running:
NAME                     READY     STATUS             RESTARTS   AGE
nginx-2601814895-znhbr   1/1       Running            0          15s
Create a Service.
kubectl create -f nginx-elb-svc.yaml
If information similar to the following is displayed, the Service has been created.
service/nginx created
View the created Service.
kubectl get svc
If information similar to the following is displayed, the workload's access mode has been configured:
NAME         TYPE           CLUSTER-IP       EXTERNAL-IP   PORT(S)        AGE
kubernetes   ClusterIP      10.247.0.1       <none>        443/TCP        3d
nginx        LoadBalancer   10.247.130.196   10.78.42.242   80:31540/TCP   51s
Enter the URL in the address box of the browser, for example, 10.78.42.242:80. 10.78.42.242 indicates the IP address of the load balancer, and 80 indicates the access port displayed on the CCE console.
The Nginx is accessible.
Figure 4 Accessing Nginx through the LoadBalancer Service