Configuration Suggestions on CCE Workload Identity Security
A workload identity enables workloads within a cluster to act as IAM users, granting them access to cloud services without the need for an IAM account's AK/SK. This helps minimize security risks.
This section describes how to use workload identities in CCE.
Notes and Constraints
The cluster version must be v1.19.16 or later.
Procedure
Obtain the signature public key of the cluster service account token from CCE. For details, see Step 1: Obtain the Signature Public Key of the CCE Cluster.
Create an identity provider on IAM. For details, see Step 2: Configure an Identity Provider.
Obtain an IAM token from the workload and simulate an IAM user to access a cloud service. For details, see Step 3: Use a Workload Identity.
The figure below shows the workflow.
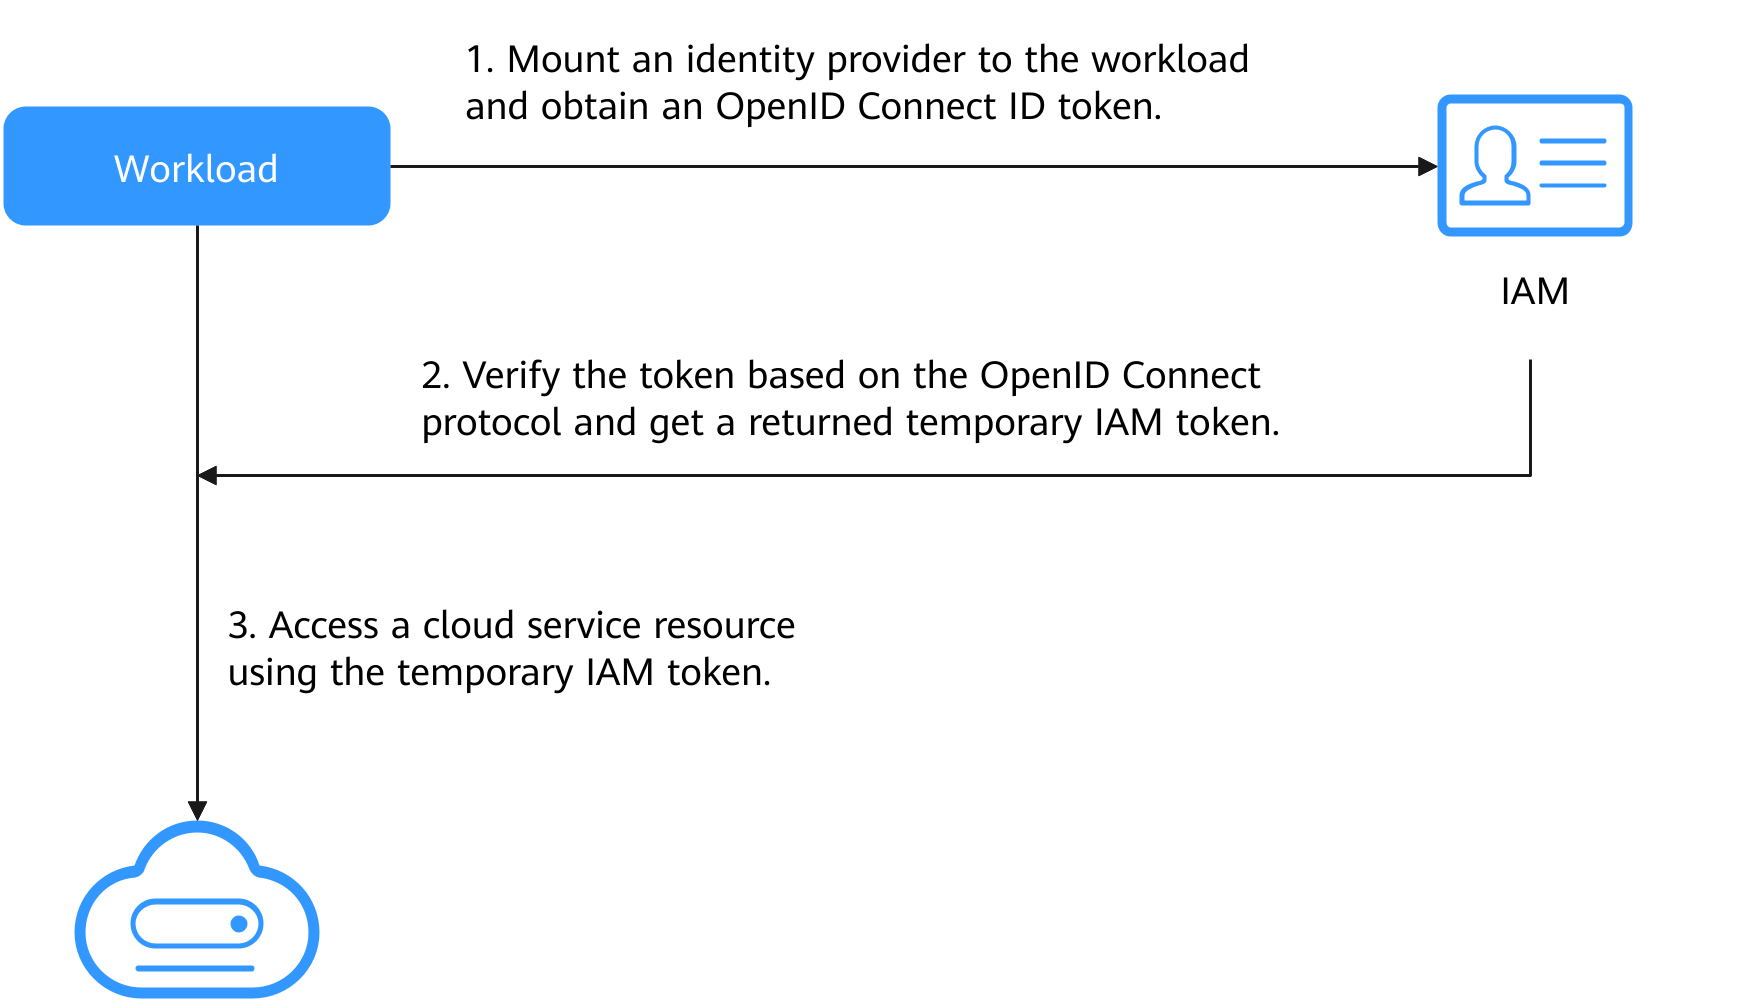
Figure 1 Workflow
Step 1: Obtain the Signature Public Key of the CCE Cluster
Use kubectl to access the target cluster.
Obtain the public key:
kubectl get --raw /openid/v1/jwks
The returned result is the public key of the cluster. The following is an example of the command output:
# kubectl get --raw /openid/v1/jwks
{"keys":[{"use":"sig","kty":"RSA","kid":"*****","alg":"RS256","n":"*****","e":"AQAB"}]}
Step 2: Configure an Identity Provider
Log in to the IAM console, choose Identity Providers in the navigation pane, and click Create Identity Provider in the upper right corner. On the displayed page, set Protocol to OpenID Connect and SSO Type to Virtual user and click OK.
In the identity provider list, locate the row containing the new identity provider and click Modify in the Operation column to modify the identity provider information.
Access Type: Select Programmatic access.
Configuration Information
Identity Provider URL: Enter https://kubernetes.default.svc.cluster.local.
Client ID: Enter a client ID, which will be used when you create a container.
Caution
A client ID cannot contain only digits. If the client ID consists only of digits, enclose it in double quotation marks ("") when editing the YAML file for the workload. For example, if the client ID is 123456789, it should be entered as "123456789" in the YAML file.
Signing Key: Enter the JWKS of the CCE cluster obtained in Step 1: Obtain the Signature Public Key of the CCE Cluster.
Identity Conversion Rules
An identity conversion rule maps the service account of a workload to an IAM user.
For example, create a service account named oidc-token in namespace default of the cluster and map it to user group demo. If you use the identity provider ID to access cloud services, you have the permissions of the demo user group. The attribute must be sub. The value is in the format of system:serviceaccount:Namespace:ServiceAccountName.
Rules are in the JSON format as follows:
[
    {
        "local": [
            {
                "user": {
                    "name": "test"
                }
            },
            {
                "group": {
                    "name": "demo"
                }
            }
        ],
        "remote": [
            {
                "type": "sub",
                "any_one_of": [
                    "system:serviceaccount:default:oidc-token"
                ]
            }
        ]
    }
]
Click OK.
Step 3: Use a Workload Identity
Create a service account, whose name must be the value of ServiceAccountName set in Step 2: Configure an Identity Provider.
apiVersion: v1
kind: ServiceAccount
metadata:
  name: oidc-token
Mount the identity provider to the workload and obtain the OIDC token file.
An example is as follows:
apiVersion: apps/v1
kind: Deployment
metadata:
  name: nginx
spec:
  replicas: 1
  selector:
    matchLabels:
      app: nginx
      version: v1
  template:
    metadata:
      labels:
        app: nginx
        version: v1
    spec:
      containers:
      - name: container-1
        image: nginx:latest
        volumeMounts:
        - mountPath: "/var/run/secrets/tokens"     # Mount the service account token generated by Kubernetes to the /var/run/secrets/tokens/oidc-token file.
          name: oidc-token
      imagePullSecrets:
      - name: default-secret
      serviceAccountName: oidc-token      # Name of the created service account
      volumes:
      - name: oidc-token
        projected:
          defaultMode: 420
          sources:
          - serviceAccountToken:
              audience: client_id   # Must be the client ID of the identity provider.
              expirationSeconds: 7200       # Expiry period
              path: oidc-token              # Path name, which can be customized
After the creation is complete, log in to the container. The content of the /var/run/secrets/tokens/oidc-token file is the service account token generated by Kubernetes.
Note
If the service account token is used for more than 24 hours or 80% of its expiry period, kubelet will automatically rotate the service account token.
Use the OIDC token to call the API for Obtaining a Token with an OpenID Connect ID Token. The X-Subject-Token field in the response header is the IAM token. Then, you can use this token to access cloud services.
The following shows an example:
curl -i --location --request POST 'https://{{iam endpoint}}/v3.0/OS-AUTH/id-token/tokens' \
 --header 'X-Idp-Id: workload_identity' \
 --header 'Content-Type: application/json' \
 --data @token_body.json
Specifically:
{{iam endpoint}} indicates the endpoint of IAM. For details, see Regions and Endpoints.
workload_identity is the identity provider name, which is the same as that configured in Step 2: Configure an Identity Provider.
token_body.json is a local file and its content is as follows:
{
  "auth" : {
    "id_token" : {
      "id" : "eyJhbGciOiJSU..."
    },
    "scope": {
      "project" : {
        "id" : "46419baef4324...",
        "name" : ******
      }
    }
  }
}
$.auth.id_token.id: The value is the content of the /var/run/secrets/tokens/oidc-token file in the container.
$.auth.scope.project.id: indicates the project ID. To obtain the value, see Obtaining a Project ID.
$.auth.scope.project.name: indicates the project name.