Using Services to Implement Simple Grayscale Release and Blue-Green Deployment
To implement grayscale release for a CCE cluster, deploy other open-source tools, such as Nginx Ingress, to the cluster or deploy services to a service mesh. These solutions are difficult to implement. If your grayscale release requirements are simple and you do not want to introduce too many plug-ins or complex configurations, you can refer to this section to implement simple grayscale release and blue-green deployment based on native Kubernetes features.
Principles
Users usually use Kubernetes objects such as Deployments and StatefulSets to deploy services. Each workload manages a group of pods. The following figure uses Deployment as an example.
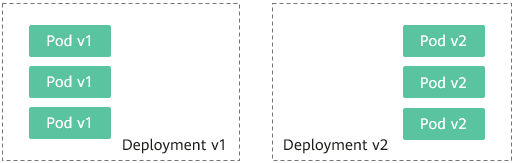
Generally, a Service is created for each workload. The Service uses the selector to match the backend pod. Other Services or objects outside the cluster can access the pods backing the Service. If a pod needs to be exposed, set the Service type to LoadBalancer. The ELB load balancer functions as the traffic entrance.
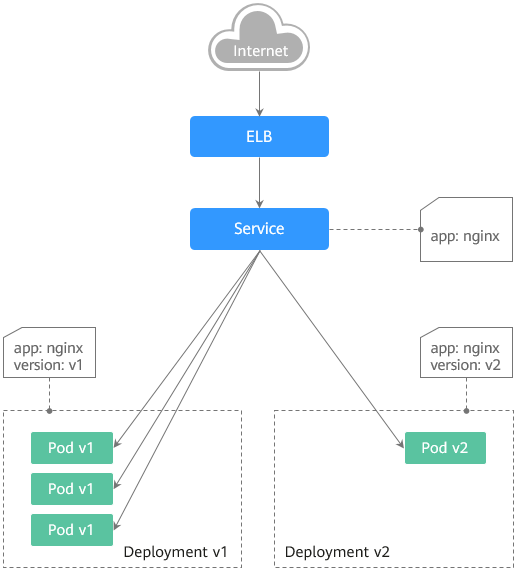
Grayscale release principles
Take a Deployment as an example. A Service, in most cases, will be created for each Deployment. However, Kubernetes does not require that Services and Deployments correspond to each other. A Service uses a selector to match backend pods. If pods of different Deployments are selected by the same selector, a Service corresponds to multiple versions of Deployments. You can adjust the number of replicas of Deployments of different versions to adjust the weights of services of different versions to achieve grayscale release. The following figure shows the process:
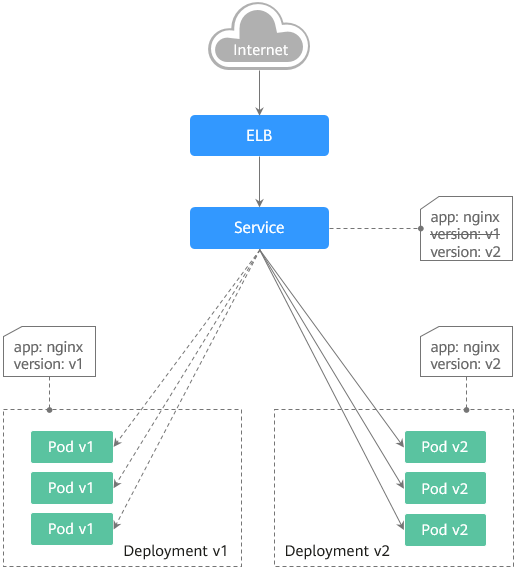
Blue-green deployment principles
Take a Deployment as an example. Two Deployments of different versions have been deployed in the cluster, and their pods are labeled with the same key but different values to distinguish versions. A Service uses the selector to select the pod of a Deployment of a version. In this case, you can change the value of the label that determines the version in the Service selector to change the pod backing the Service. In this way, you can directly switch the service traffic from one version to another. The following figure shows the process:
Prerequisites
The Nginx image has been uploaded to SWR. The Nginx images have two versions: v1 and v2. The welcome pages are Nginx-v1 and Nginx-v2.
Resource Creation
You can use YAML to deploy Deployments and Services in either of the following ways:
On the Create Deployment page, click Create YAML on the right and edit the YAML file in the window.
Save the sample YAML file in this section as a file and use kubectl to specify the YAML file. For example, run the kubectl create -f xxx.yaml command.
Step 1: Deploy Services of Two Versions
Two versions of Nginx services are deployed in the cluster to provide external access through ELB.
Create a Deployment of the first version. The following uses nginx-v1 as an example. Example YAML:
apiVersion: apps/v1
kind: Deployment
metadata:
  name: nginx-v1
spec:
  replicas: 2               # Number of replicas of the Deployment, that is, the number of pods
  selector:                 # Label selector
    matchLabels:
      app: nginx
      version: v1
  template:
    metadata:
      labels:               # Pod label
        app: nginx
        version: v1
    spec:
      containers:
      - image: {your_repository}/nginx:v1 # The image used by the container is nginx:v1.
        name: container-0
        resources:
          limits:
            cpu: 100m
            memory: 200Mi
          requests:
            cpu: 100m
            memory: 200Mi
      imagePullSecrets:
      - name: default-secret
Create a Deployment of the second version. The following uses nginx-v2 as an example. Example YAML:
apiVersion: apps/v1
kind: Deployment
metadata:
  name: nginx-v2
spec:
  replicas: 2               # Number of replicas of the Deployment, that is, the number of pods
  selector:                 # Label selector
    matchLabels:
      app: nginx
      version: v2
  template:
    metadata:
      labels:               # Pod label
        app: nginx
        version: v2
    spec:
      containers:
      - image: {your_repository}/nginx:v2   # The image used by the container is nginx:v2.
        name: container-0
        resources:
          limits:
            cpu: 100m
            memory: 200Mi
          requests:
            cpu: 100m
            memory: 200Mi
      imagePullSecrets:
      - name: default-secret
You can log in to the CCE console to view the deployment status.
Step 2: Implement Grayscale Release
Create a LoadBalancer Service for the Deployment. Do not specify the version in the selector. Enable the Service to select the pods of the Deployments of two versions. Example YAML:
apiVersion: v1
kind: Service
metadata:
  annotations:
    kubernetes.io/elb.id: 586c97da-a47c-467c-a615-bd25a20de39c    # ID of the ELB load balancer. Replace it with the actual value.
  name: nginx
spec:
  ports:
  - name: service0
    port: 80
    protocol: TCP
    targetPort: 80
  selector:             # The selector does not contain version information.
    app: nginx
   type: LoadBalancer   # Service type (LoadBalancer)
Run the following command to test the access:
for i in {1..10}; do curl <EXTERNAL_IP>; done;
<EXTERNAL_IP> indicates the IP address of the ELB load balancer.
The command output is as follows (Half of the responses are from the Deployment of version v1, and the other half are from version v2):
Nginx-v2
Nginx-v1
Nginx-v1
Nginx-v1
Nginx-v2
Nginx-v1
Nginx-v2
Nginx-v1
Nginx-v2
Nginx-v2
Use the console or kubectl to adjust the number of replicas of the Deployments. Change the number of replicas to 4 for v1 and 1 for v2.
kubectl scale deployment/nginx-v1 --replicas=4
kubectl scale deployment/nginx-v2 --replicas=1
Run the following command to test the access again:
for i in {1..10}; do curl <EXTERNAL_IP>; done;
<EXTERNAL_IP> indicates the IP address of the ELB load balancer.
In the command output, among the 10 access requests, only two responses are from the v2 version. The response ratio of the v1 and v2 versions is the same as the ratio of the number of replicas of the v1 and v2 versions, that is, 4:1. Grayscale release is implemented by controlling the number of replicas of services of different versions.
Nginx-v1
Nginx-v1
Nginx-v1
Nginx-v1
Nginx-v2
Nginx-v1
Nginx-v2
Nginx-v1
Nginx-v1
Nginx-v1
Note
If the ratio of v1 to v2 is not 4:1, you can set the number of access times to a larger value, for example, 20. Theoretically, the more the times, the closer the response ratio between v1 and v2 is to 4:1.
Step 3: Implement Blue-Green Deployment
Create a LoadBalancer Service for a deployed Deployment and specify that the v1 version is used. Example YAML:
apiVersion: v1
kind: Service
metadata:
  annotations:
    kubernetes.io/elb.id: 586c97da-a47c-467c-a615-bd25a20de39c    # ID of the ELB load balancer. Replace it with the actual value.
  name: nginx
spec:
  ports:
  - name: service0
    port: 80
    protocol: TCP
    targetPort: 80
  selector:             # Set the version to v1 in the selector.
    app: nginx
    version: v1
  type: LoadBalancer    # Service type (LoadBalancer)
Run the following command to test the access:
for i in {1..10}; do curl <EXTERNAL_IP>; done;
<EXTERNAL_IP> indicates the IP address of the ELB load balancer.
The command output is as follows (all responses are from the v1 version):
Nginx-v1
Nginx-v1
Nginx-v1
Nginx-v1
Nginx-v1
Nginx-v1
Nginx-v1
Nginx-v1
Nginx-v1
Nginx-v1
Use the console or kubectl to modify the selector of the Service so that the v2 version is selected.
kubectl patch service nginx -p '{"spec":{"selector":{"version":"v2"}}}'
Run the following command to test the access again:
for i in {1..10}; do curl <EXTERNAL_IP>; done;
<EXTERNAL_IP> indicates the IP address of the ELB load balancer.
The returned results show that are all responses are from the v2 version. The blue-green deployment is successfully implemented.
Nginx-v2
Nginx-v2
Nginx-v2
Nginx-v2
Nginx-v2
Nginx-v2
Nginx-v2
Nginx-v2
Nginx-v2
Nginx-v2