Enabling Backup Locking
Scenarios
To prevent the backup data from being deleted by mistake or maliciously, you can enable backup locking for vaults to improve data security.
Once enabled, all backups in the vault enter the WORM (write once, read many) status. No one can delete the backups that are in their retention periods.
This section describes how to enable backup locking for a vault. You can also enable it when creating a vault.
Note
Backup locking does not affect normal backup, restoration, and replication operations.
Manual backups are not affected by backup locking and can be manually deleted.
Constraints
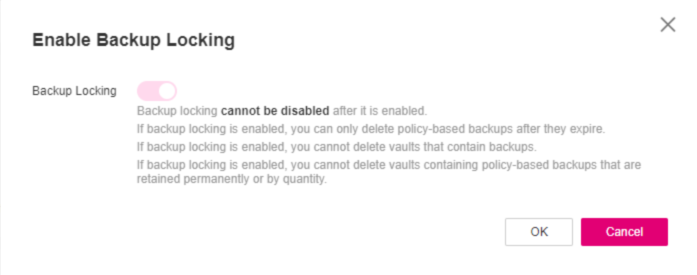
Backup locking cannot be disabled after it is enabled.
After backup locking is enabled, associated resources cannot be dissociated and files cannot be migrated.
After backup locking is enabled, policy-based backups can only be deleted after they expire. You cannot manually delete them.
Enabling Backup Locking for an Existing Vault
Log in to the CBR console.
Log in to the management console.
Click
 in the upper left corner and select a region.
Click
 and choose Storage > Cloud Backup and Recovery. Select a backup type from the left navigation pane.
On any backup page, locate the target vault and choose More > Enable Backup Locking in the Operation column.
In the displayed dialog box, click OK to enable backup locking.
Figure 1 Backup locking
Click OK.
The vault list is displayed, and you can see that the value in the Back Locking column is Enabled.