Configuring a User-defined VLAN (Ubuntu)
This section uses Ubuntu 16.04 LTS (Xenial Xerus x86_64) as an example to describe how to configure a user-defined VLAN for BMSs.
Note
The configuration methods of other Ubuntu OSs are similar to that of Ubuntu 16.04 LTS (Xenial Xerus x86_64).
Use a key or password to log in to the BMS as user root.
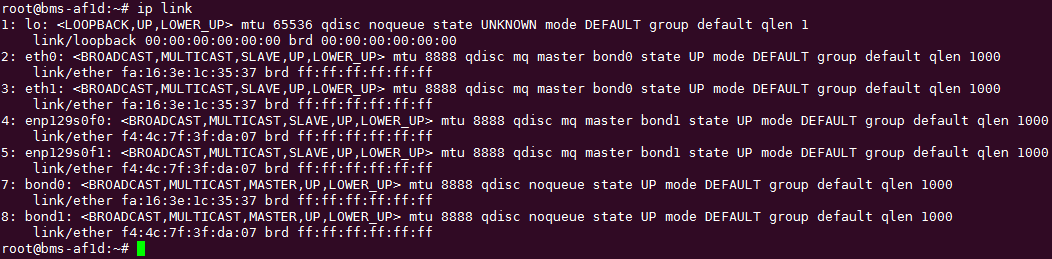
On the BMS CLI, run the following command to check the NIC information:
ip link
Information similar to the following is displayed:
1: lo: <LOOPBACK,UP,LOWER_UP> mtu 65536 qdisc noqueue state UNKNOWN mode DEFAULT group default qlen 1
    link/loopback 00:00:00:00:00:00 brd 00:00:00:00:00:00
2: eth0: <BROADCAST,MULTICAST,SLAVE,UP,LOWER_UP> mtu 8888 qdisc mq master bond0 state UP mode DEFAULT group default qlen 1000
    link/ether fa:16:3e:1c:35:37 brd ff:ff:ff:ff:ff:ff
3: eth1: <BROADCAST,MULTICAST,SLAVE,UP,LOWER_UP> mtu 8888 qdisc mq master bond0 state UP mode DEFAULT group default qlen 1000
    link/ether fa:16:3e:1c:35:37 brd ff:ff:ff:ff:ff:ff
4: enp129s0f0: <BROADCAST,MULTICAST> mtu 1500 qdisc noop state DOWN mode DEFAULT group default qlen 1000
    link/ether f4:4c:7f:3f:da:07 brd ff:ff:ff:ff:ff:ff
5: enp129s0f1: <BROADCAST,MULTICAST> mtu 1500 qdisc noop state DOWN mode DEFAULT group default qlen 1000
    link/ether f4:4c:7f:3f:da:08 brd ff:ff:ff:ff:ff:ff
6: bond0: <BROADCAST,MULTICAST,MASTER,UP,LOWER_UP> mtu 8888 qdisc noqueue state UP mode DEFAULT group default qlen 1000
    link/ether fa:16:3e:1c:35:37 brd ff:ff:ff:ff:ff:ff
Note
Among the devices, eth0 and eth1 bear the VPC, and enp129s0f0 and enp129s0f1 bear the user-defined VLAN. In the following steps, enp129s0f0 and enp129s0f1 are used to configure a user-defined VLAN.
Run the following command to check whether the /etc/udev/rules.d/ directory contains the 80-persistent-net.rules file:
ll /etc/udev/rules.d/ | grep 80-persistent-net.rules
Run the following command to copy the /etc/udev/rules.d/70-persistent-net.rules file and name the copy as /etc/udev/rules.d/80-persistent-net.rules.
cp -p /etc/udev/rules.d/70-persistent-net.rules /etc/udev/rules.d/80-persistent-net.rules
Configure the udev rules:
Add the NICs and their MAC addresses obtained in step 2, except lo, eth0, eth1, and bond0, to the /etc/udev/rules.d/80-persistent-net.rules file. This ensures that the names and sequence of NICs will not change after the BMS is restarted.
Note
Ensure that the NIC MAC address and names are lowercase letters.
vim /etc/udev/rules.d/80-persistent-net.rules
The modification result is as follows:
SUBSYSTEM=="net", ACTION=="add", DRIVERS=="?*", ATTR{address}=="e8:4d:d0:c8:99:5b", NAME="eth0"
SUBSYSTEM=="net", ACTION=="add", DRIVERS=="?*", ATTR{address}=="e8:4d:d0:c8:99:5c", NAME="eth1"
SUBSYSTEM=="net", ACTION=="add", DRIVERS=="?*", ATTR{address}=="f4:4c:7f:3f:da:07", NAME="enp129s0f0"
SUBSYSTEM=="net", ACTION=="add", DRIVERS=="?*", ATTR{address}=="f4:4c:7f:3f:da:08", NAME="enp129s0f1"
After the modification, press Esc, enter :wq, save the configuration, and exit.
Run the following command to copy the /etc/network/interfaces.d/50-cloud-init.cfg file to generate the /etc/network/interfaces.d/60-cloud-init.cfg file:
cp -p /etc/network/interfaces.d/50-cloud-init.cfg /etc/network/interfaces.d/60-cloud-init.cfg
Note
If the /etc/network/interfaces.d/50-cloud-init.cfg file does not exist, copy the /etc/network/interfaces file and run the following commands:
mkdir /etc/network/interfaces.d
cp -p /etc/network/interfaces /etc/network/interfaces.d/60-cloud-init.cfg
Run the following command to edit the /etc/network/interfaces.d/60-cloud-init.cfg file of devices enp129s0f0 and enp129s0f1:
vim /etc/network/interfaces.d/60-cloud-init.cfg
Edit the file as follows:
auto enp129s0f0
iface enp129s0f0 inet manual
bond_mode 1
bond-master bond1
bond_miimon 100
mtu 8888
auto enp129s0f1
iface enp129s0f1 inet manual
bond_mode 1
bond-master bond1
bond_miimon 100
mtu 8888
auto bond1
iface bond1 inet static
bond_miimon 100
bond-slaves none
bond_mode 1
address 10.10.10.3
netmask 255.255.255.0
hwaddress f4:4c:7f:3f:da:07
mtu 8888
Where,
enp129s0f0 and enp129s0f1 are the NICs that bear the user-defined VLAN.
hwaddress is the MAC address of enp129s0f0.
Change the value of address to the IP address allocated to bond1. If the IP address planned for the user-defined VLAN does not conflict with the VPC network segment, you can plan the IP address as needed, only to ensure that BMSs communicating through the user-defined VLAN are in the same network segment as the user-defined VLAN.
Set the value of netmask to the subnet mask of the IP address configured for bond1.
Set values of other parameters. For example, set mtu to 8888, bond_miimon to 100, and bond_mode to 1.
After the modification, press Esc, enter :wq, save the configuration, and exit.
Run the following commands to restart the network:
ifup enp129s0f0
ifup enp129s0f1
Note
enp129s0f0 and enp129s0f1 are the NICs that bear the user-defined VLAN.
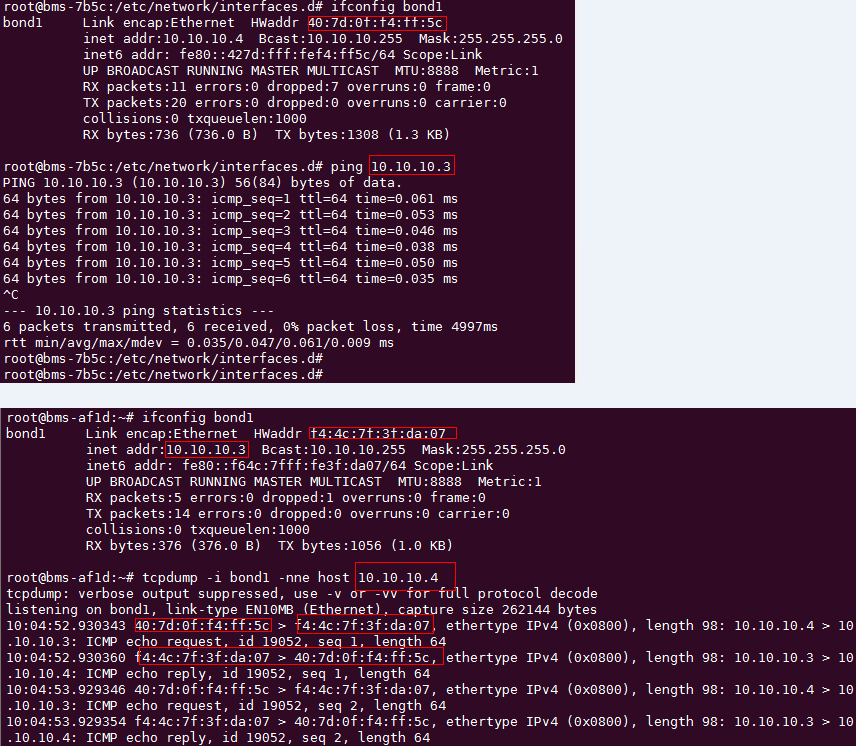
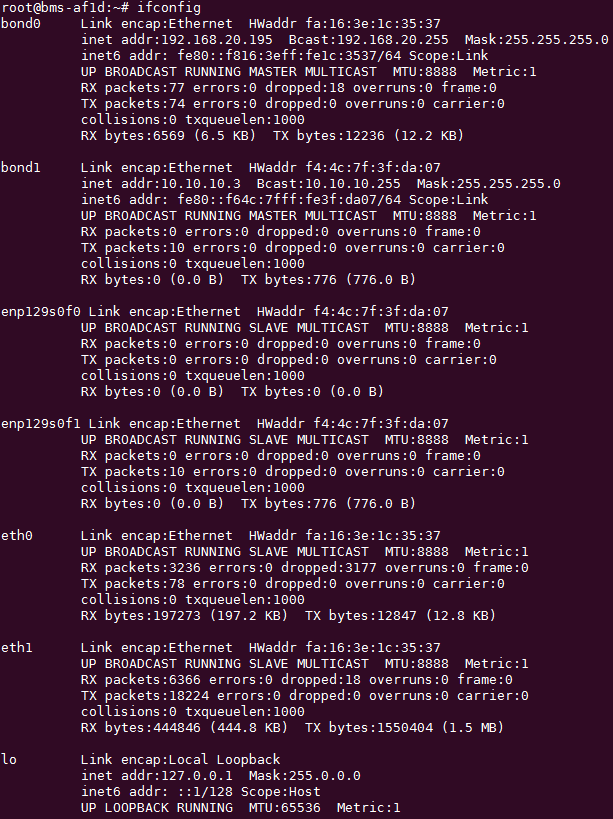
Run the following commands to check the NIC device status and whether the bond1 configuration file takes effect:
ip link
ifconfig
Perform the preceding operations to configure other BMSs.
After all BMSs are configured, ping the IP addresses of other BMSs from each BMS.